Introduction
Did you know that “hybrid desserts” (like the Cronut or Brookie) are one of the fastest-growing culinary trends of the last decade? It seems our palates are no longer satisfied with just one treat; we demand the texture and flavor of multiple desserts stacked into one glorious bite.
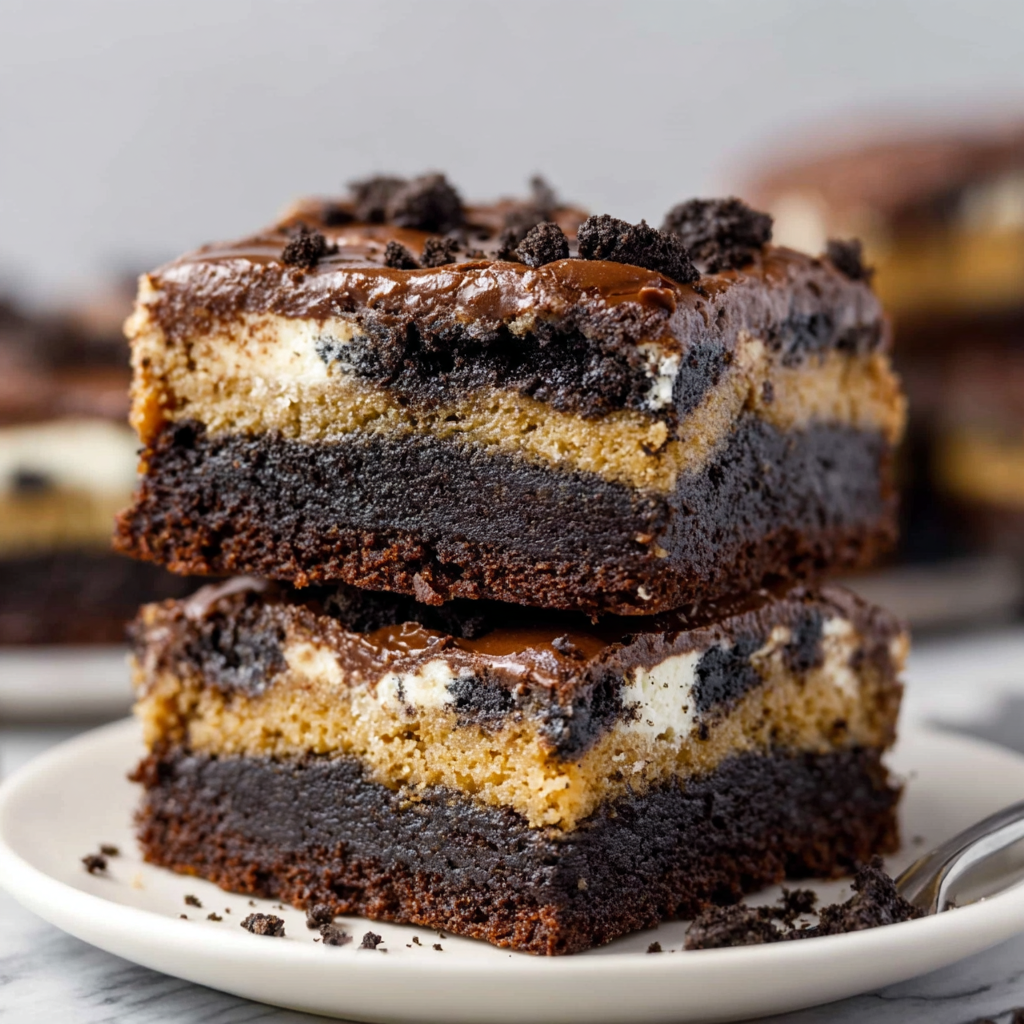
This recipe for Ultimate Cookie Oreo Brownies is the pinnacle of that trend. It is an architectural feat of sugar, fat, and cocoa, combining four distinct layers: a dense, fudgy brownie base, a layer of actual Oreos, a chewy chocolate chip cookie dough center, and a glossy ganache topping. It challenges the common baking belief that “less is more” and instead screams “more is better.” If you have ever been unable to decide between a cookie, a brownie, or an Oreo, this recipe is your answer. It’s decadent, it’s over-the-top, and it is guaranteed to be the star of any dessert table.
Ingredients List
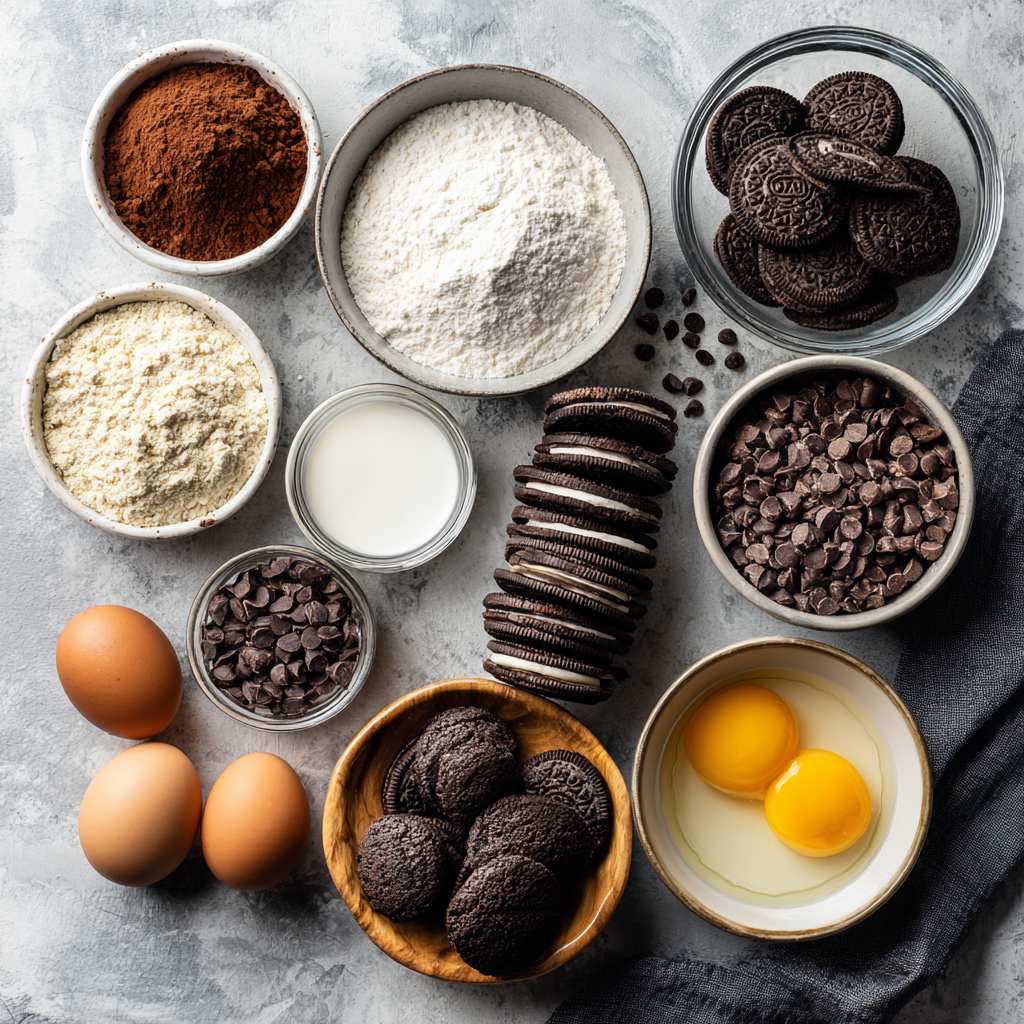
To create these distinct layers, you need to assemble the components for three separate recipes. Here is your shopping list.
Layer 1: The Fudgy Brownie Base
- ½ Cup Unsalted Butter: Melted.
- 1 Cup Granulated Sugar: For a crispy top and moist interior.
- 2 Large Eggs: Room temperature.
- 1 Teaspoon Vanilla Extract.
- ⅓ Cup Unsweetened Cocoa Powder: Dutch-process yields a darker color and smoother flavor.1
- ½ Cup All-Purpose Flour.
- ¼ Teaspoon Salt.
Layer 2: The Oreo Bridge
- 16–20 Whole Oreo Cookies: Double Stuf works best for a more distinct white layer.
Layer 3: The Cookie Dough Center
- ½ Cup Unsalted Butter: Softened.
- ¼ Cup Granulated Sugar.
- ½ Cup Light Brown Sugar (Packed).
- 1 Large Egg.
- 1 ¼ Cups All-Purpose Flour: (Heat-treated if you plan to eat raw dough, but here it gets baked).
- ½ Teaspoon Baking Soda.
- 1 Cup Semisweet Chocolate Chips.
Layer 4: The Glossy Ganache Top
- 1 Cup Semisweet Chocolate Chips.
- ½ Cup Heavy Cream.
- Crushed Oreos/Cookie Crumbs: For garnish.
Substitutions:
- Brownie Mix: To save time, you can use a boxed brownie mix for the base. Prepare it according to the “fudgy” instructions on the box.
- Cookie Dough: You can also use store-bought refrigerated cookie dough for the center layer.2
Timing
This is a project bake, requiring assembly and cooling time.
- Preparation Time: 40 minutes
- Cooking Time: 35–40 minutes
- Cooling Time: 2 hours (Crucial for slicing)
- Total Time: Approx. 3 hours 20 minutes
Data Insight: While this takes time, you are essentially making three desserts at once. The active time per layer is less than 15 minutes, making it efficient for the yield.
Step-by-Step Instructions
Step 1: The Brownie Foundation
Preheat oven to 350°F (175°C). Line a 9×9 inch square baking pan with parchment paper or foil, leaving an overhang for easy removal. Grease the lining.
- Mix: In a medium bowl, whisk melted butter and sugar. Beat in eggs and vanilla. Stir in cocoa powder, flour, and salt until just combined. Do not overmix.
- Pour: Spread the brownie batter evenly into the prepared pan.
Step 2: The Oreo Layer
Place the whole Oreo cookies in a single layer directly on top of the wet brownie batter. Press them down very slightly so they are embedded but not submerged.
Step 3: The Cookie Dough Layer
In a separate bowl, cream the softened butter, granulated sugar, and brown sugar until fluffy. Beat in the egg and vanilla. Stir in flour and baking soda. Fold in chocolate chips.
- Technique: Drop spoonfuls of cookie dough carefully over the Oreo layer. Use an offset spatula to gently spread it into an even layer, sealing in the Oreos.
Step 4: The Bake
Bake for 35–40 minutes.
- Doneness Test: The top cookie layer should be golden brown. A toothpick inserted into the center will not come out clean (due to the melted chocolate and fudgy base), but it shouldn’t have raw batter on it. The center may still seem slightly soft; it will set upon cooling.
Step 5: The Cool Down
Let the bars cool completely in the pan on a wire rack for at least 1 hour.
- Crucial: Do not try to frost or cut them while warm, or the layers will slide apart.
Step 6: The Ganache Finish
Once cooled, make the ganache. Place chocolate chips in a heat-proof bowl. Heat heavy cream in a small saucepan until simmering (edges bubble), then pour over the chips. Let sit for 5 minutes, then whisk slowly until smooth and glossy.
- Pour & Top: Pour the ganache over the cooled bars and spread to the edges. Sprinkle immediately with cookie crumbs and crushed Oreos. Refrigerate for 1 hour to set the ganache before slicing.
Nutritional Information
This is the definition of an “occasional treat.” Here is the estimated breakdown per square (based on 16 squares):
| Nutrient | Amount | % Daily Value |
| Calories | 450 kcal | – |
| Total Fat | 24g | 36% |
| Saturated Fat | 14g | 70% |
| Carbohydrates | 58g | 20% |
| Sugars | 42g | – |
| Protein | 5g | 10% |
Data Insight: One bar contains nearly half the recommended daily intake of added sugar for an adult. Share with friends!
Healthier Alternatives for the Recipe
There is no “healthy” version of this, but there are “lighter” modifications:
- Smaller Portions: Cut the 9×9 pan into 25 mini squares instead of 16.
- Dark Chocolate: Use 70% dark chocolate for the ganache and chips to increase antioxidant content and reduce sugar slightly.
- Thin Oreos: Use “Oreo Thins” to reduce the calorie count of the middle layer by about 30%.
Serving Suggestions
How to serve a dessert that has everything?
- Temperature: These are best served at room temperature. If refrigerated, let them sit out for 30 minutes before serving so the cookie dough layer softens and the brownie becomes fudgy again.
- A la Mode: A scoop of vanilla bean ice cream is the only acceptable topping. The cold cream balances the rich chocolate.
- Drink Pairing: A tall glass of cold milk is non-negotiable. A hot espresso is a sophisticated alternative that cuts the sweetness.
Common Mistakes to Avoid
Don’t let your layers turn into a muddle.
- Cutting Too Soon:
- The Error: Slicing while warm.
- The Result: A messy pile of goo where the layers are indistinguishable.
- The Fix: Patience. Chill them before cutting for clean layers.
- Overbaking:
- The Error: Waiting for the toothpick to be perfectly clean.
- The Result: A dry brownie base and a hard cookie top.
- The Fix: Pull them when the center still has a slight jiggle.
- Using Melted Butter for Cookie Layer:
- The Error: Using melted instead of softened butter for the cookie dough.
- The Result: The dough will be too greasy and spread too much, melting into the Oreos.
Storing Tips for the Recipe
These bars are sturdy and store well.
- Room Temperature: Store in an airtight container for up to 3 days.
- Refrigerator: Store for up to 1 week. The ganache remains shinier when refrigerated.
- Freezing:
- Slice the bars. Wrap each one individually in plastic wrap, then place in a freezer bag.
- Freeze for up to 3 months. Thaw on the counter for 1 hour before eating.
Conclusion
The Ultimate Cookie Oreo Brownie stack is more than a dessert; it is an experience. It’s the answer to the indecisive sweet tooth and the centerpiece of any celebration. By meticulously layering three beloved treats and topping them with a glossy finish, you create a brownie that is texturally complex, visually stunning, and undeniably delicious.
Summary: A four-layer dessert bar featuring a fudge brownie base, a layer of whole Oreos, a chocolate chip cookie dough center, and a glossy chocolate ganache topping.
Ready to break the internet (and your diet)?
Preheat that oven! Rate this recipe 5 stars if you survived the sugar rush, and leave a comment below: did you use a box mix or make it from scratch? Subscribe for more over-the-top baking recipes!
FAQs
Can I use a 9×13 pan?
Yes, but the layers will be much thinner. You may need to increase the cookie dough recipe by 50% to cover the Oreos completely. Reduce baking time to 25–30 minutes.
Why did my ganache separate/break?
This happens if the cream was too hot, or if you whisked too vigorously, separating the fat. To fix it, try whisking in a teaspoon of warm milk vigorously. If that fails, let it cool slightly and use an immersion blender to re-emulsify it.
Can I use Golden Oreos?
Absolutely. Golden Oreos pair wonderfully with the cookie dough layer, creating a “blonde” middle section that looks beautiful when sliced.
How do I get clean slices like in the photo?
Three secrets:
- Chill the bars thoroughly.
- Use a large, sharp chef’s knife.
- Run the knife under hot water and wipe it dry before every single cut. The heat melts through the ganache and chocolate chips cleanly.
Leave a Reply