Here is a comprehensive, SEO-optimized, and kid-friendly WordPress blog post designed to rank for “Growing Baking Soda Forest Experiment” while providing clear scientific value.
The Magic Growing Baking Soda Forest: A Colorful STEM Activity
Introduction
Looking for a science experiment that doubles as an art project? If you have a kitchen, you probably have everything you need right now to create a Growing Baking Soda Forest.
This isn’t your standard “volcano” experiment. While it uses the classic baking soda and vinegar reaction, the technique is different. By controlling the liquid application, we can encourage the baking soda to fizz upwards and harden, creating a rugged, colorful landscape that looks just like a mystical forest. It is a fantastic way to teach kids about chemical reactions, states of matter, and color mixing—all while making a beautiful mess (on a tray, of course!).
Let’s grab our pipettes and grow some science!
Experiment Snapshot
- Difficulty: Easy / Toddler Friendly
- Prep Time: 5 Minutes
- Activity Time: 15-30 Minutes
- Mess Level: Moderate (Use a tray!)
- Science Topic: Acid-Base Reactions & Crystallization
Materials Needed
You don’t need a lab coat for this one—just a trip to the pantry.
- Baking Soda: Approx. 2 cups (you want enough to make substantial mounds).
- Liquid Food Coloring: Red, yellow, green, and blue (to mix for secondary colors).
- Liquid Base:
- Option A (Mild): Water
- Option B (The “Super Grower”): 50% Water + 50% White Vinegar (Recommended for best results).
- Tools:
- Shallow plate, baking sheet, or tray (to contain the overflow).
- Small bowls (for mixing colors).
- Droppers, pipettes, or even a small spoon.
Step-by-Step Instructions
Step 1: Plant the “Seeds”
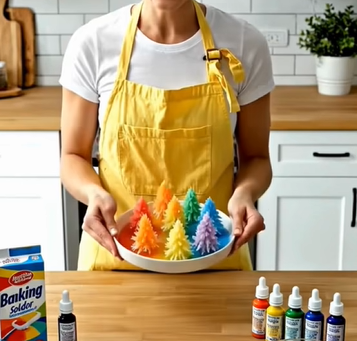
Place your shallow tray on a flat surface. Take your baking soda and arrange 6 to 8 mounds in a circle or a forest cluster.
- Technique: Use about 2 tablespoons per mound. Pinch the tops with your fingers to shape them into cones or pyramids. These are your “trees” waiting to grow.
Step 2: Prepare the “Magic Rain”
In your small bowls, mix your liquid solution.
- The Mix: We strongly recommend using the 50/50 Vinegar and Water blend. While water will dissolve the baking soda, the vinegar is the secret ingredient that creates the gas needed for vertical growth.
- The Color: Add 5-10 drops of food coloring to each bowl. Make a variety of colors:
- Green (Forest vibe)
- Purple (Red + Blue)
- Orange (Red + Yellow)
Step 3: Start the Reaction
Hand your child the dropper. Instruct them to drip the colored liquid onto the very top tip of a baking soda mound.
- Observation: Watch as the liquid hits the powder. The fizzing will start immediately. Unlike a volcano that explodes outward, adding the liquid slowly allows the reaction to bubble upward, creating craggy, tree-like textures.
Step 4: Watch the Forest Grow
Continue adding drops to the mounds. You can mix colors on a single mound to create “ombre” trees.
- The Hardening: As the reaction settles, the mixture will begin to solidify. Let the forest sit undisturbed for 2 to 4 hours. The mushy baking soda paste will dry out and crystallize, leaving behind a permanent, colorful, crusty forest sculpture!
The Science Behind the Magic
Why does the forest “grow” and fizz? It’s all about chemistry.
Baking soda ($NaHCO_3$) is a base, and vinegar (which contains acetic acid, $CH_3COOH$) is an acid. When they meet, they exchange protons in a chemical reaction that creates three new things:
- Sodium Acetate: A type of salt.
- Water: ($H_2O$)
- Carbon Dioxide: ($CO_2$)
The “growth” you see is the Carbon Dioxide gas trying to escape the mixture. The gas bubbles get trapped in the thick baking soda paste, pushing it upward and outward before popping. As the water evaporates later, the sodium acetate and remaining baking soda harden into the cool crystal shapes you see left behind.
Pro Tips for Success
- Use Vinegar for Height: If you only use water, the baking soda will just get wet and clump. You need the acid from the vinegar to create the gas bubbles that push the structure upward.
- Go Slow: If you dump the liquid all at once, you get a puddle. If you use a dropper, you get a tree. Patience is key!
- Easy Cleanup: This experiment is safe to wash down the sink. In fact, the baking soda and vinegar can actually help clean your drain!
- Preservation: If you want to keep the forest, let it dry in a sunny spot for a full 24 hours. The mounds will become hard and chalky, perfect for display.
Conclusion
The Growing Baking Soda Forest is the perfect rainy day activity. It combines fine motor skills (using the dropper), artistic creativity (color mixing), and hard science (chemical reactions). Plus, the sensory experience of hearing the fizz and seeing the colors explode is satisfying for kids of all ages.
Ready to start your forest? Check your vinegar supply! If you try this experiment, tag us in your photos—we’d love to see your colorful creations.
Leave a Reply