Introduction
Did you know that the combination of cherries and pistachios is a culinary classic rooted in Italian gelato tradition (think Spumoni)? The earthy, savory notes of the roasted nuts perfectly cut through the bright acidity of the red fruit.
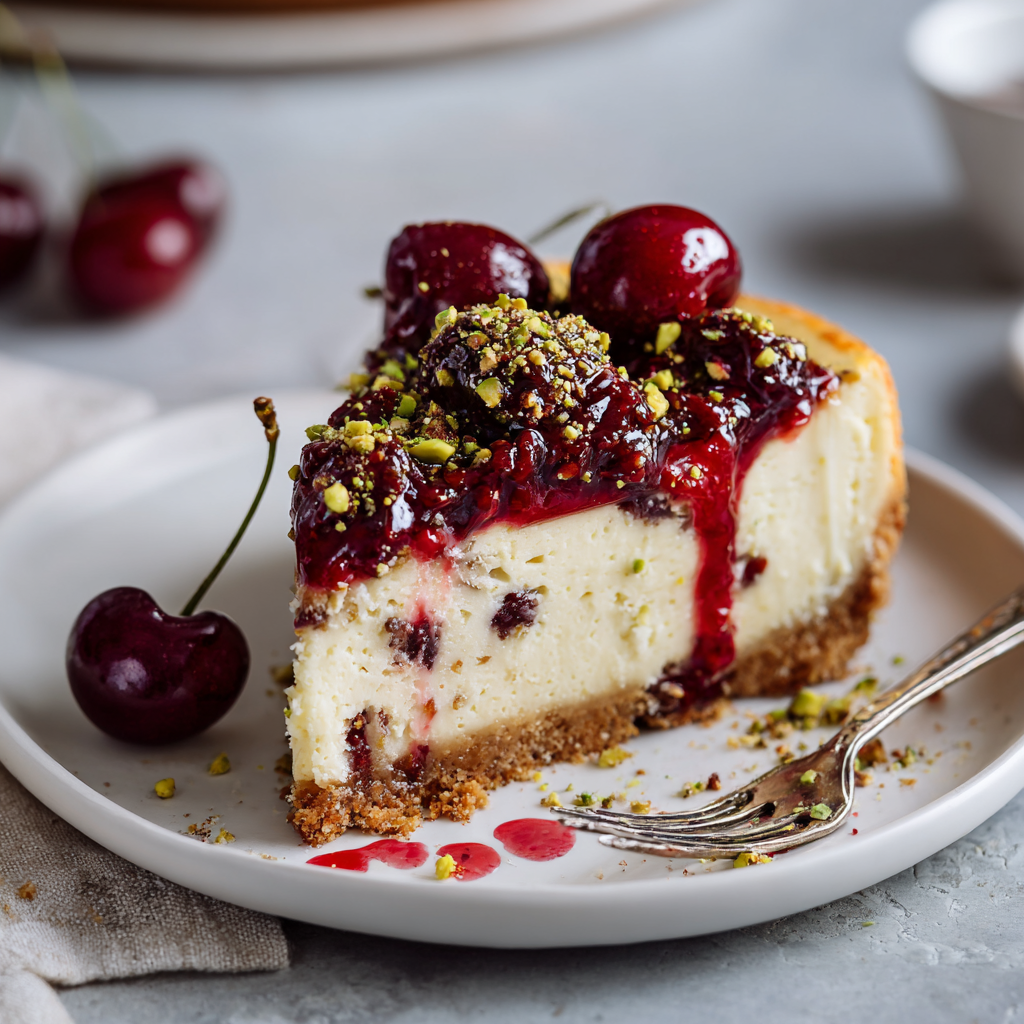
This Cherry Pistachio Cheesecake is a showstopper, both visually and texturally. It features a buttery, golden graham cracker crust supporting a creamy, pale green filling infused with finely ground pistachios.1 It is all crowned with a ruby-red cherry topping that glistens like jewels. Whether you are looking for a festive holiday dessert (the red and green color scheme is natural!) or a sophisticated end to a dinner party, this recipe delivers a bakery-quality result without requiring a degree in pastry arts.
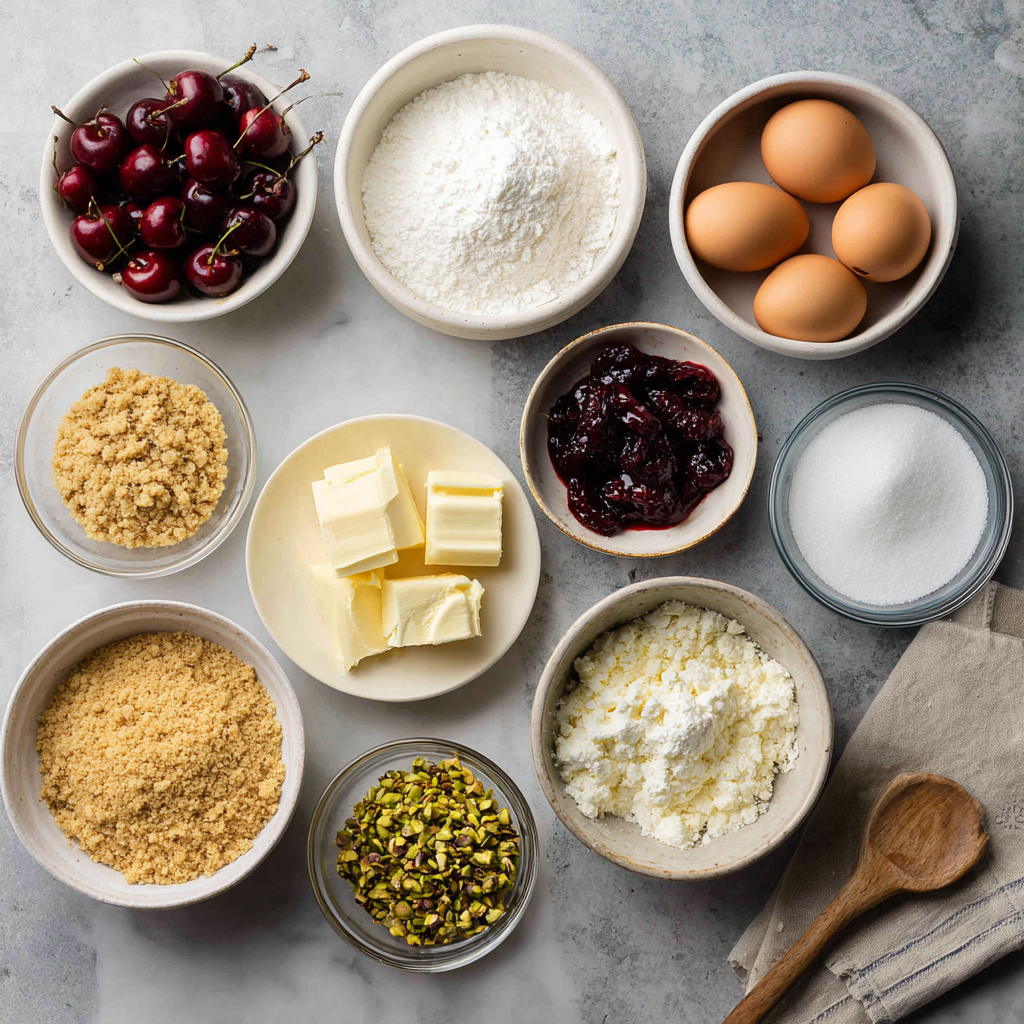
Ingredients List
To get the authentic pistachio flavor without artificial extracts, we use real nuts in the batter.
The Buttery Base
- 1 ½ cups Graham Cracker Crumbs: (About 10-12 full sheets).
- 1/3 cup Unsalted Butter: Melted.
- ¼ cup Granulated Sugar: To help the crust harden.
- Pinch of Salt: To cut the sweetness.
The Pistachio Cheesecake Filling
- 24 oz (3 blocks) Cream Cheese: Full fat, softened to room temperature. Crucial: If it’s cold, your batter will be lumpy.
- 1 cup Granulated Sugar.
- ¾ cup Shelled Pistachios: Unsalted, roasted. Finely ground into a “flour” (but stop before it turns to butter!).
- 3 Large Eggs: Room temperature.
- 1 cup Sour Cream: Adds tang and ensures a silky texture.
- 1 tsp Vanilla Extract.
- ½ tsp Almond Extract: The Secret: Almond extract amplifies the cherry/pistachio flavor profile significantly.
- Green Food Coloring (Optional): 1-2 drops if you want a more vibrant green color.
The Cherry Topping
- 1 can (21 oz) Cherry Pie Filling: High quality (like Duncan Hines Wilderness).
- Or Homemade: 2 cups fresh cherries pitted, simmered with ½ cup sugar and 1 tbsp cornstarch until thick.
Sensory Note: The cheesecake is dense and creamy with a slight texture from the ground nuts, contrasting with the crunch of the crust and the soft, juicy pop of the cherries.
Timing
Cheesecake is a test of patience. Do not rush the cooling process.
- Preparation Time: 30 minutes
- Baking Time: 60-70 minutes
- Cooling/Chilling Time: 6 hours (Minimum)
- Total Time: ~8 hours
Data Insight: Cooling a cheesecake gradually (in the turned-off oven, then on the counter, then in the fridge) prevents the surface temperature from dropping too fast. This temperature shock is the #1 cause of the dreaded “Grand Canyon” crack down the center.
Step-by-Step Instructions
Step 1: The Crust
Preheat your oven to 325°F (160°C).
- Mix the graham cracker crumbs, melted butter, sugar, and salt in a bowl.
- Press firmly into the bottom (and slightly up the sides) of a 9-inch springform pan.
- Bake: Bake for 10 minutes to set the crust. Let it cool while you make the filling.
Step 2: The Pistachio Dust
Place the shelled pistachios in a food processor. Pulse until they resemble coarse sand.
- Warning: Do not over-process, or you will end up with pistachio butter.
Step 3: The Batter
In a large bowl or stand mixer, beat the softened cream cheese and sugar on medium speed until completely smooth and creamy (about 3 minutes).
- Add the sour cream, vanilla, almond extract, and the ground pistachios. Mix until combined.
- The Eggs: Add the eggs one at a time, mixing on low speed just until the yolk disappears. Do not overbeat once the eggs are added; this whips air into the batter, which causes cracks.
Step 4: The Water Bath (Insurance Policy)
Wrap the bottom of your springform pan in two layers of heavy-duty aluminum foil to prevent leaks.
- Pour the batter over the crust. Smooth the top.
- Place the springform pan inside a larger roasting pan. Fill the roasting pan with hot water until it reaches halfway up the side of the cheesecake pan.
Step 5: Bake
Bake for 60 to 70 minutes.

- Doneness Test: The edges should be set and puffy, but the center (about 2-3 inches) should still jiggle like Jell-O when you nudge the pan.
Step 6: The Slow Cool
Turn off the oven. Crack the oven door open slightly (stick a wooden spoon in the door to hold it).
- Let the cheesecake sit in the cooling oven for 1 hour.
- Remove from the water bath and cool completely on the counter.
- Refrigerate for at least 4 hours (preferably overnight).
Step 7: The Garnish
Just before serving, spoon the cherry topping over the chilled cheesecake.
- Optional: Sprinkle with extra chopped pistachios for crunch.
Nutritional Information
A slice of luxury. Below is the estimated breakdown per slice (based on 12 slices).
| Nutrient | Amount per Serving | % Daily Value* |
| Calories | 460 kcal | 23% |
| Total Fat | 32g | 49% |
| Saturated Fat | 16g | 80% |
| Carbohydrates | 38g | 13% |
| Sugars | 28g | – |
| Protein | 8g | 16% |
Variations for the Recipe
- The “Pudding Hack”: For a simpler, lighter version, swap the ground nuts for 1 package of Instant Pistachio Pudding Mix added to the batter. Omit 1/2 cup of sugar if doing this. It will be greener and smoother.
- Chocolate Crust: Swap graham crackers for crushed Oreos. Chocolate, cherry, and pistachio is a winning trio.
- White Chocolate Swirl: Melt 4 oz of white chocolate and stir it into the batter for a sweeter, creamier finish.
Serving Suggestions
- Whipped Cream: A dollop of unsweetened whipped cream balances the sweet cherry topping.
- The Cut: Run a chef’s knife under hot water and wipe dry between every single slice for clean, bakery-style cuts.
- Drink Pairing: Serve with a dessert wine like Port or a cup of black coffee.
Common Mistakes to Avoid
- Cold Ingredients:
- The Issue: Using fridge-cold cream cheese.
- The Result: Lumpy batter.
- The Fix: Leave ingredients out for 2 hours before starting.
- Skipping the Water Bath:
- The Issue: Dry heat.
- The Result: Rubber texture and cracks on top.
- The Fix: The water bath keeps the oven moisture high and the heat gentle.2
- Overbaking:
- The Issue: Waiting until the center is solid.
- The Result: A dry, crumbly cake.
- The Fix: Trust the jiggle! It sets as it cools.
Storing Tips for the Recipe
- Refrigeration: Store loosely covered in the fridge for up to 5 days.
- Freezing:
- Method: Freeze the cheesecake without the cherry topping. Wrap tightly in plastic and foil.
- Duration: Good for up to 2 months. Thaw in the fridge overnight, then add cherries.
Conclusion
Cherry Pistachio Cheesecake is a dessert that looks as good as it tastes. The contrast between the nutty, pale green filling and the glossy red fruit creates a sophisticated flavor profile that isn’t just “sugar on sugar.” It’s creamy, crunchy, tart, and sweet—a perfect harmony on a fork.
Ready to bake? Get that cream cheese softening! If you try this recipe, please leave a star rating below and let us know: did you use the water bath method? Don’t forget to subscribe to our newsletter for more showstopping dessert recipes.
FAQs
Q: Can I use fresh cherries for the topping?
A: Yes! Pit 2 cups of fresh cherries and simmer them with 1/2 cup sugar and 1 tablespoon cornstarch (dissolved in water) until thickened. Cool completely before topping.
Q: Do I have to use a springform pan?
A: It is highly recommended. You cannot flip a cheesecake out of a standard cake pan without destroying it. If you don’t have one, use a deep pie dish, but you’ll have to serve it scoop-style.
Q: Can I use salted pistachios?
A: If you only have salted nuts, omit the pinch of salt in the crust and batter. However, rinse the salt off the nuts and dry them first if they are heavily salted, or the cake will taste savory.
Leave a Reply