Looking for a hands-on activity that combines creativity with a little bit of chemistry? These Bouncing Rainbow Balls are the perfect solution.
This bright science craft turns simple household ingredients into bouncy magic. It creates a soft, squishy solid that kids can mix, twist, and roll into their own unique designs. Once they are done crafting, the real fun begins—testing how high they can bounce!
It is the perfect blend of STEM learning, sensory play, and artistic fun, all wrapped up in one easy afternoon project.
🧪 What You’ll Need
Gather these supplies to get started. You likely have most of them in your pantry already!
- ½ cup White PVA glue (school glue works best)
- ¼ cup Liquid starch
- 1 tablespoon Cornstarch
- ½ teaspoon Baking soda
- Food coloring (Various bright colors: red, blue, yellow, green)
- Mixing bowl & Spoon
- Small cups (for mixing individual colors)
🥣 How to Make It
Follow these steps to create your own bouncy masterpiece.
Step 1: Create the Base
Pour the white glue into your large mixing bowl. Add the baking soda and stir well until the powder is fully dissolved and combined with the glue.
Step 2: Thicken the Mixture
Add the cornstarch to the glue mixture. Stir vigorously until the texture creates a smooth, creamy batter. This helps give the ball its substance!
Step 3: Activate the Dough
Slowly pour in the liquid starch while stirring continuously. You will see science happen right before your eyes! The mixture will begin to react, thicken rapidly, and pull away from the sides of the bowl.
Step 4: Add the Color
Once the dough creates a glob, remove it from the bowl. Divide the dough into smaller portions (one for each color you want to use).
- Place each portion into a small cup.
- Add a few drops of different food coloring to each portion.
- Knead the dough gently with your hands until the color is evenly mixed and vibrant.
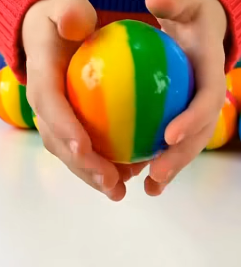
Step 5: Create the Rainbow
Now for the artistic part! Take your different colored pieces of dough.
- Lightly twist or layer them together.
- Roll the dough between your palms to form a smooth ball.
- Caution: Be gentle! If you roll too much, the colors will blend into a muddy brown. You want distinct swirls for that rainbow effect.
Step 6: Rest & Bounce
Patience is key. Let the balls sit and rest for 10–15 minutes. This allows the polymers to set and firm up. Once they are dry to the touch, take them to a hard floor and watch them bounce!
💡 Crafty Tips for Success
** The Swirl Technique:** When combining your colors, twist them just once or twice before rolling into a ball. This preserves the distinct “tie-dye” look.
** bounce High:** These balls work best on hard surfaces like tile, wood, or concrete. Carpet will absorb the energy and stop the bounce.
** Storage:** To keep the balls squishy for future play, store them in an airtight container or a zip-lock bag. If left out too long, they will eventually harden completely.
🔬 How It Works (Simple Science)
Why does liquid glue turn into a bouncy ball? It’s all about Polymers.
Glue contains long chains of molecules (polymers) that slide past each other like cooked spaghetti. When you add the liquid starch and cornstarch, a chemical reaction occurs called cross-linking. The starch acts like a net, connecting the glue chains together so they can no longer slide freely. This creates a flexible, rubbery solid that stretches, squishes, and—most importantly—bounces!
⚠️ Safety Notes
- Adult supervision is recommended, especially for younger children.
- While these look like candy, they are not edible. Do not ingest any materials.
- Always wash hands thoroughly after playing.
Leave a Reply