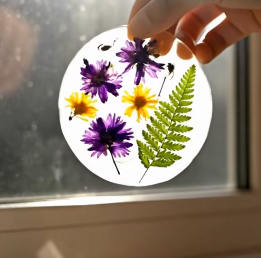
Bring the beauty of the outdoors inside with this eco-friendly craft where sunlight brings botanical art to life.
These Natural Bioplastic Suncatchers are a sustainable project made entirely from plant-based materials and real flowers. Unlike regular plastic, this “bioplastic” is biodegradable and chemical-free. When hung in a window, the material creates a stunning stained-glass effect, allowing the colors of nature to glow through.
It is the perfect activity for spring crafts, nature studies, and teaching kids about eco-conscious creativity.
🌿 What You’ll Need
The Bioplastic Base
- 1 cup Water
- 1 tablespoon Cornstarch
- 1 teaspoon White vinegar
- 1 teaspoon Glycerin (vegetable-based)
The Decorations
- Fresh or dried flowers
- Leaves, petals, or grasses
The Tools
- Small saucepan
- Spoon or whisk
- Measuring spoons
- Parchment paper or silicone mat
- Cookie cutters or jar lids (optional, for shaping)
- Straw or skewer (to make hanging holes)
- String or twine
🥣 How to Make It
Follow these simple steps to create your own biodegradable art.
Step 1: Mix the Base
In your saucepan, combine the water, cornstarch, vinegar, and glycerin. Whisk the mixture thoroughly until it is completely smooth and there are no lumps left.
Step 2: Heat the Mixture
Place the saucepan on low to medium heat, stirring constantly. This part happens quickly! After a few minutes, the liquid will thicken and turn glossy, resembling a clear gel.
- Note: Once the mixture is thick and translucent, remove it from the heat immediately.
Step 3: Pour and Shape
Carefully pour the warm bioplastic onto your parchment paper or silicone mat.
- You can spread it freehand into thin circles using a spoon.
- Alternatively, place cookie cutters on the mat and pour the gel inside them for specific shapes.
Step 4: Add the Botanicals
While the bioplastic is still wet, gently press your flowers, petals, and leaves into the surface.
- Arrange them flat so they are fully embedded.
- Be creative with patterns—try mandalas or simple garden scenes!
Step 5: Add Hanging Holes
Before the plastic dries, take a straw or skewer and poke a small hole near the top of each suncatcher. This is where your string will go later.
Step 6: The Waiting Game (Drying)
Let the suncatchers air-dry for 24–48 hours.
- Pro Tip: Flip them over halfway through the drying process to ensure both sides dry evenly.
- When fully dry, they will be firm, flexible, and slightly translucent.
Step 7: Hang & Enjoy
Thread a piece of string or twine through the hole and hang your creation in a sunny window. Watch as the light passes through, illuminating your natural artwork! ☀️
💡 Tips for Best Results
✨ Clarity is Key: Spread the bioplastic into thin layers. Thicker layers take longer to dry and may remain cloudy, blocking the light.
🥀 Dried vs. Fresh: While you can use fresh blooms, dried flowers tend to keep their vibrant colors longer and don’t introduce extra moisture to the plastic.
🫧 No Bubbles: When adding your flowers, press them down gently to release any trapped air bubbles underneath petals.
🏠 Keep it Dry: Bioplastic loves dry air. Avoid hanging these in humid areas (like bathrooms) or outside, as moisture can soften them.
🔬 How It Works (Simple Science)
How does cornstarch turn into plastic?
When you heat cornstarch with water and acid (vinegar), the starch molecules unravel and reorganize. This creates a biopolymer. The glycerin acts as a “plasticizer,” which stops the material from becoming brittle and cracking as it dries. The result is a flexible, plastic-like material that is 100% plant-based and biodegradable!
⚠️ Safety Notes
- Adult supervision is recommended during the heating and pouring steps.
- These suncatchers are not waterproof—keep them indoors to preserve them.
- Although natural, the final product is not for ingestion.
Leave a Reply