
Introduction
Did you know that a standard serving of deep-fried chicken parmesan can contain upwards of 1,000 calories and 60 grams of fat? It is a statistic that often forces comfort food lovers to choose between their health goals and their palate. But what if you could achieve the Maillard reaction—that scientific gold standard of browning and crunch—without submerging your dinner in a vat of oil?
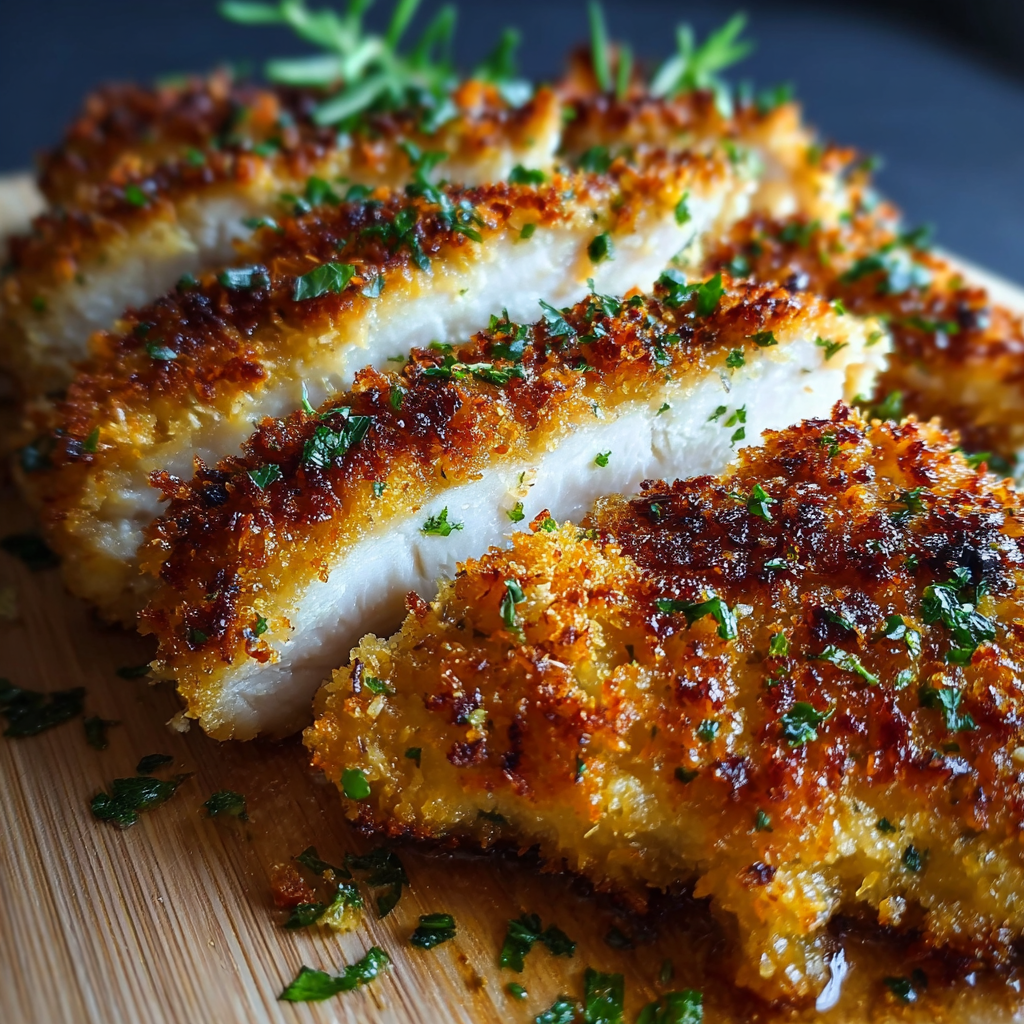
This Crispy Baked Parmesan Chicken (Poulet Croustillant au Parmesan) is the answer to the weeknight dinner dilemma. It delivers a crust that shatters upon impact and meat that remains impossibly juicy, all achieved in a standard oven. By leveraging the low moisture content of Panko breadcrumbs and the natural oils found in Parmesan cheese, we create a convection effect that mimics frying. In this guide, we will master the “standard breading procedure,” explore why pounding chicken is non-negotiable, and how to prevent the dreaded “soggy bottom” that plagues most baked recipes.
Ingredients List
To achieve a restaurant-quality crust, the texture of your ingredients matters just as much as the flavor.
The Protein
- Chicken Breasts (2 large, boneless, skinless): You will slice these horizontally to create 4 cutlets.
- Sensory Note: You want cutlets that are uniform in thickness so they cook at the exact same rate.
- Salt & Black Pepper: For the initial seasoning of the meat.
The Breading Station
- All-Purpose Flour (½ cup): The first layer that dries the meat so the egg sticks.
- Eggs (2 large): Beaten with a splash of water. This is the glue.
- Panko Breadcrumbs (1 cup):
- Data Insight: Japanese Panko crumbs are electrocuted during processing to create slivers rather than crumbs. This results in less oil absorption and a crunch factor that stays crisp 3x longer than traditional Italian breadcrumbs.
- Parmesan Cheese (¾ cup, freshly grated):
- Critical: Use the “sand-like” grated texture, not large shreds. It mixes better with the Panko for even coverage.
The Seasoning Blend
- Garlic Powder (1 tsp): For savory depth.
- Dried Oregano or Basil (1 tsp): Adds an Italian herbal note.
- Paprika (½ tsp): Mostly for color, giving the crust a golden hue.
- Olive Oil or Cooking Spray: Essential to help the breadcrumbs brown in the oven.
Timing
This recipe is faster than ordering delivery and significantly healthier.
- Preparation Time: 15 minutes.
- Cooking Time: 15–20 minutes.
- Resting Time: 5 minutes.
- Total Time: Approx. 35–40 minutes.
Data Insight: Baking chicken at a high temperature ($400^{\circ}\text{F}$ / $200^{\circ}\text{C}$) reduces the cooking time by 30% compared to lower temperatures, sealing in juices before they can evaporate.
Step-by-Step Instructions
Step 1: The Butterfly and Pound
Slice your chicken breasts in half horizontally to make four thin cutlets. Place them between two sheets of plastic wrap. Using a meat mallet or a heavy rolling pin, pound them to an even $\frac{1}{2}$-inch thickness.
- Why this matters: Uniform thickness ensures the chicken cooks through before the cheese burns.
Step 2: Set Up the Dredging Station
Prepare three shallow bowls (pie dishes work great):
- Bowl 1: Flour mixed with a pinch of salt and pepper.
- Bowl 2: Beaten eggs.
- Bowl 3: Panko breadcrumbs, grated Parmesan cheese, garlic powder, oregano, and paprika mixed together.
Step 3: The “Dry-Wet-Dry” Method
Take a chicken cutlet:
- Dredge in Flour: Shake off the excess. You want a thin dusting, not a cakey layer.
- Dip in Egg: Ensure it is fully coated. Let the excess drip off.
- Press into Crumbs: Lay it in the Panko/Parmesan mix. Press down firmly with your palm to adhere the crumbs. Flip and repeat.
Step 4: Rack ‘Em Up
Place a wire rack over a baking sheet. Spray the rack with non-stick spray. Place the breaded chicken on the rack.
- Actionable Tip: Spray the tops of the chicken generously with olive oil spray. This introduces fat to the breadcrumbs, ensuring they turn golden brown rather than staying pale and chalky.
Step 5: The High-Heat Bake
Bake at $400^{\circ}\text{F}$ ($200^{\circ}\text{C}$) for 15–20 minutes.
- The Test: The chicken is safe to eat when the internal temperature reaches $165^{\circ}\text{F}$ ($74^{\circ}\text{C}$). However, pulling it at $160^{\circ}\text{F}$ and letting it rest allows the residual heat to finish the cooking without drying it out.
Nutritional Information
Here is how this baked version compares to the traditional fried variety. Breakdown per serving (1 cutlet):
| Nutrient | Baked Parmesan Chicken | Fried Chicken Parmesan |
| Calories | ~320 kcal | ~650+ kcal |
| Total Fat | 12g | 40g |
| Saturated Fat | 5g | 12g |
| Protein | 35g | 30g |
| Carbohydrates | 14g | 35g |
- Data Insight: By baking, you eliminate the deep-frying oil absorption, which can add up to 2 tablespoons of oil (240 calories) per piece of chicken.
Healthier Alternatives for the Recipe
Customize your Crispy Baked Parmesan Chicken to fit your diet:
- Keto / Low-Carb: Replace the flour with Coconut Flour or Whey Protein Isolate, and replace the Panko breadcrumbs with crushed Pork Rinds or Almond Flour. The Parmesan cheese is naturally keto-friendly.
- Gluten-Free: Simply use a 1:1 Gluten-Free Flour blend for the first step and buy certified Gluten-Free Panko. The texture is almost identical.
- The “Mayo Method”: Skip the flour and egg. Brush the chicken with a thin layer of light mayonnaise (or Greek yogurt), then press directly into the breadcrumbs. The mayo keeps the chicken incredibly moist.
- Spice Kick: Add $\frac{1}{2}$ teaspoon of Cayenne pepper to the breadcrumb mixture for a “Hot & Spicy” version.
Serving Suggestions
Turn this protein main into a complete meal:
- Classic Italian: Serve over spaghetti with marinara sauce and fresh basil.
- The Lighter Option: Slice the chicken and serve it atop a large Arugula Salad with lemon vinaigrette and shaved fennel. The acidity cuts through the savory cheese crust.
- Vegetable Pairing: Roasted broccoli or asparagus cooks at the same temperature ($400^{\circ}\text{F}$), making them the perfect tray-mates.
- Sandwich It: Place the cutlet on a toasted ciabatta roll with marinara and melted provolone for a gourmet chicken parm sandwich.
Common Mistakes to Avoid
Don’t let your crust fail you:
- Soggy Bottoms: If you bake the chicken directly on the sheet pan, steam gets trapped underneath, making the bottom mushy. Always use a wire rack to allow airflow around the entire cutlet.
- The “Bald” Chicken: If the breading falls off, it’s usually because the chicken was too wet before dredging. Pat the chicken dry with paper towels before dipping it in the flour.
- Pale Crust: If your chicken looks white and pasty after 20 minutes, you didn’t use enough oil spray. The Panko needs a little surface fat to brown. Broil for the last 1–2 minutes if needed (watch closely!).
- Bland Taste: Season every layer. Salt the flour, salt the eggs, and ensure the breadcrumb mix has herbs and garlic.
Storing Tips for the Recipe
Crispy chicken is best fresh, but leftovers can be salvaged.
- Refrigerator: Store in an airtight container between layers of paper towels (to absorb moisture) for up to 3 days.
- Reheating:Do not microwave. Microwaving steams the crust, making it rubbery.
- Best Method: Reheat in an Air Fryer at $375^{\circ}\text{F}$ for 4 minutes.
- Oven Method: Place on a wire rack at $350^{\circ}\text{F}$ for 10 minutes.
- Freezing: You can freeze the breaded (uncooked) cutlets. Place them on a sheet pan to freeze solid, then transfer to a bag. Bake from frozen, adding 5–10 minutes to the cooking time.
Conclusion
This Crispy Baked Parmesan Chicken proves that you don’t need a deep fryer to achieve culinary bliss. It offers the perfect textural contrast between the nutty, crunchy Parmesan-Panko crust and the tender meat inside. It is a foolproof method that brings the bistro experience to your kitchen table in under 40 minutes.
Ready to hear that crunch? Preheat your oven now! If you try this recipe, please leave a 5-star review below and share your favorite side dish pairing. Don’t forget to subscribe for more healthy comfort food makeovers.
FAQs
Can I use chicken thighs?
Yes! Boneless, skinless chicken thighs work beautifully. They are juicier than breasts but may require an extra 3–5 minutes of cooking time due to the higher fat content and different muscle structure.
Do I need to flip the chicken?
If you are using a wire rack, no flipping is necessary as the heat circulates underneath. If you are baking directly on a sheet pan (not recommended), flip halfway through to ensure both sides brown.
Can I use pre-grated parmesan from a shaker can?
Technically, yes. The shaker-can cheese (like Kraft) actually crisps up very well because it is dry. However, the flavor will be saltier and less complex than fresh Parmesan Reggiano.
Why is my breading burning?
This happens if your oven rack is too high (too close to the heating element) or if your oven runs hot. Move the rack to the center position and check your oven temperature with an external thermometer.
Is this recipe suitable for meal prep?
It is great for “cold” meal prep (chicken caesar salads), but if you plan to reheat it, ensure you have access to a toaster oven or air fryer. Soggy microwaved breading is rarely enjoyable.
Leave a Reply