Introduction
Did you know that the process of crystallization is responsible for everything from the snowflakes outside your window to the diamonds in jewelry? In the world of at-home education, Borax Crystals are the undisputed king of chemistry experiments. Search data shows a consistent spike in “STEM activities for kids” during school breaks, but this isn’t just for children.
This Crystal Growing Experiment is a lesson in patience and molecular geometry. Unlike slime (which is messy) or vinegar volcanos (which are fleeting), growing crystals creates a permanent, glittering artifact. It utilizes the concept of supersaturation to turn a pipe cleaner into a geode-like sculpture overnight. In this guide, we will master the perfect Borax-to-water ratio, explain why “nucleation sites” matter, and how to preserve your crystals forever.
Materials List
This experiment relies on a specific chemical reaction, so the ingredients are non-negotiable.
The Chemistry
- Borax Powder (Sodium Tetraborate): Found in the laundry aisle.
- Why Borax? While you can grow crystals with salt or sugar, Borax crystals grow significantly faster (overnight vs. weeks) and are much sturdier and clearer.
- Boiling Water: Temperature is critical. The water must be near boiling (212∘F / 100∘C) to dissolve enough powder.
The Structure (Nucleation Sites)
- Pipe Cleaners (Chenille Stems): The fuzzy fibers provide thousands of tiny surface points for the crystals to latch onto.
- String or Fishing Line: To suspend the structure.
- Pencils or Craft Sticks: To bridge the top of the jar.
- Wide-Mouth Glass Jars: Mason jars or recycled pickle jars work best. Glass is preferred over plastic as it holds heat longer, allowing for slower cooling (and larger crystals).
Timing
This is a lesson in delayed gratification.
- Preparation Time: 20 minutes.
- Waiting Time: 12–24 hours.
- Total Time: Approx. 24 hours.
Data Insight: A solution that cools down slowly grows larger, more distinct crystals. A solution that cools rapidly (e.g., in the fridge) creates tiny, sand-like crystals. Patience yields the best geometric results.
Step-by-Step Instructions
Step 1: The Design Phase
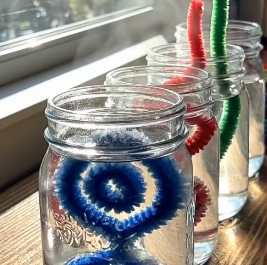
Twist your pipe cleaners into shapes. Spirals, hearts, stars, or snowflakes work well.
- Critical Check: Insert your shape into the dry jar to test the fit. It must not touch the bottom or the sides, or the crystals will fuse the shape to the glass, trapping it forever.
Step 2: The Suspension Setup
Tie a piece of string to your pipe cleaner shape. Tie the other end to the pencil.
- Dangle the shape into the jar and adjust the string length so it hangs freely in the center of the “void.” Remove the shape and set aside.
Step 3: The Supersaturated Solution
Boil your water. Measure the ratio: 3 Tablespoons of Borax per 1 Cup of Water.
- Pour the boiling water into the jar (adult supervision required).
- Add the Borax one tablespoon at a time, stirring until completely dissolved.
- The Saturation Point: You want the water to be cloudy. If you see a little bit of undissolved powder at the bottom, that is perfect—it means the water cannot hold any more Borax.
Step 4: The Submersion
Gently lower your pipe cleaner shape into the hot liquid. Rest the pencil across the mouth of the jar.
- Cover the jar with a paper towel or coffee filter (to keep dust out while allowing heat to escape slowly).
Step 5: The Watch
Place the jar in a spot where it will not be disturbed or bumped.
- Wait 12 to 24 hours. As the water cools, the molecules move closer together and force the Borax out of the liquid state and onto the pipe cleaner.
Step 6: The Reveal
Lift the pencil. Your fuzzy pipe cleaner will now be encased in hard, geometric crystals! Place them on a paper towel to dry.
The Science Behind the Sparkle
Why does this happen? It is all about Solubility.
| Variable | Hot Water | Cold Water |
| Space for Molecules | Expanded (High) | Contracted (Low) |
| Borax Capacity | High Saturation | Low Saturation |
| Result | Powder dissolves | Powder precipitates (solidifies) |
Export to Sheets
Data Insight: Hot water molecules are energetic and spaced far apart, making room for the Borax powder. As the water cools, it loses energy and contracts. The Borax no longer “fits” in the water, so it precipitates out. It naturally seeks a surface to cling to—your pipe cleaner.
Variations for the Experiment
Customize your Crystal Gardens:
- Glow-in-the-Dark: Carefully break open a yellow highlighter and soak the felt tube in the water while boiling. The resulting crystals will glow under a UV blacklight (thanks to fluorescein).
- Giant Geode: Use an eggshell (cleaned and dried) instead of a pipe cleaner. Coat the inside with glue and a dusting of Borax, then submerge. The crystals will grow inside the shell like a real geode.
- Alum Crystals: If you want perfectly clear, diamond-like crystals, use Alum Powder (found in the spice aisle) instead of Borax. The ratio is usually ¾ cup Alum to 2 cups water.
Safety & Troubleshooting
While Borax is a natural mineral, safety is paramount.
- Is Borax Safe? It is a cleaning agent and can irritate the skin or eyes. Do not ingest. Wash hands after handling the solution. Keep away from pets.
- Why didn’t crystals grow?
- Not enough Borax: If the solution wasn’t saturated, the Borax stays in the water. Add more powder.
- Water too cool: You must start with boiling water to get the “super” saturation.
- Why are my crystals small? The water cooled too fast. Try wrapping the jar in a towel to insulate it, slowing the cooling process for larger crystal formation.
Storing Your Crystals
Borax crystals are durable, but humidity can eventually turn them white and chalky (a process called efflorescence).
- The Clear Coat: To preserve their shine and transparency indefinitely, take the dry crystals outside and spray them with a light coat of Clear Acrylic Sealer or clear nail polish. This locks out moisture.
- Display: Hang them in a window as sun catchers or use them as holiday ornaments.
Conclusion
This Crystal Growing Experiment transforms your kitchen into a laboratory. It is a mesmerizing way to visualize how temperature affects molecular density, and the results are beautiful enough to keep as decor. Whether you are a curious kid or an adult looking for a moment of zen, watching these structures emerge from nothing is pure magic.
Ready to grow some gems? Boil that kettle! If you try this experiment, tell us what shapes you made in the comments below.
FAQs
Can I reuse the Borax water?
Yes! After you pull the crystals out, you can reheat the remaining water in the microwave, add a little more Borax to re-saturate it, and make a second batch.
Can I use food coloring?
Yes. Add 20 drops of food coloring to the water in Step 3. The crystals will pick up a light tint of that color (though they will be lighter than the water). Using colored pipe cleaners is a more effective way to get vibrant colors.
How long do they last?
If sealed with clear coat, they last for years. If unsealed, they may start to turn white/opaque after a few months depending on the humidity in your home.
Can I touch the solution?
Brief contact is fine, but prolonged contact can dry out your skin or cause irritation. It is best to use a spoon.
Can I use salt instead?
You can, but salt crystals (halite) grow much slower and usually form as a crust on the rim of the jar rather than large chunks on the string. Epsom salts are a faster alternative to table salt.
Leave a Reply