Introduction
Did you know that searches for “creative holiday baking” peak historically during the second week of December? While standard cookies are delicious, the modern holiday host is often looking for a “wow factor”—a dessert that doubles as table décor. The Chocolate Christmas Tree Cupcake is the undisputed champion of this category.
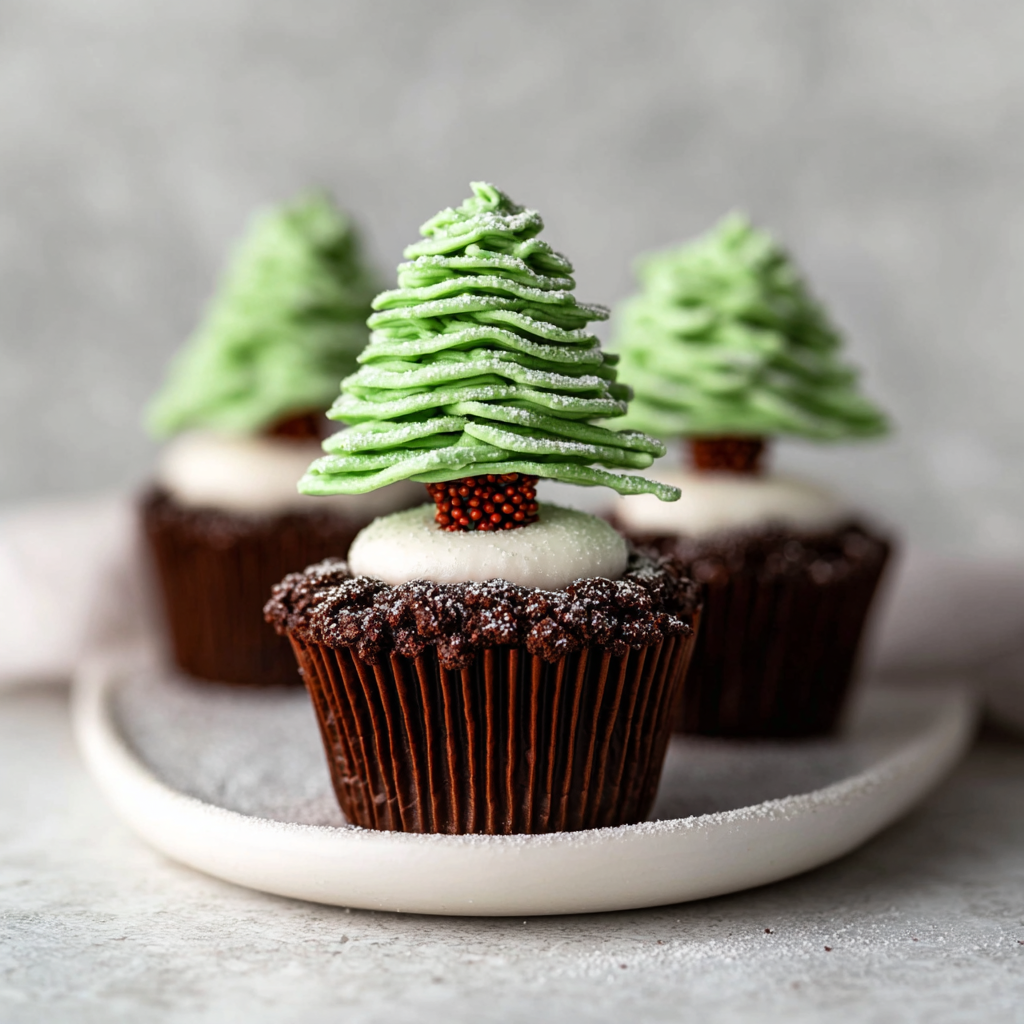
However, a common failure point with these treats is the “melting tree.” Piling inches of heavy buttercream high enough to look like a pine tree often leads to a slumped, sad mess at room temperature. This recipe solves the structural integrity issue by using a secret internal support system: the inverted sugar cone. By piping green frosting onto a crunchy waffle cone base, we create a perfectly conical, 3D evergreen that stands tall, adds a delightful crunch, and prevents frosting overload. Paired with a rich, moist chocolate peppermint base, these cupcakes are a masterpiece of engineering and flavor.
Ingredients List
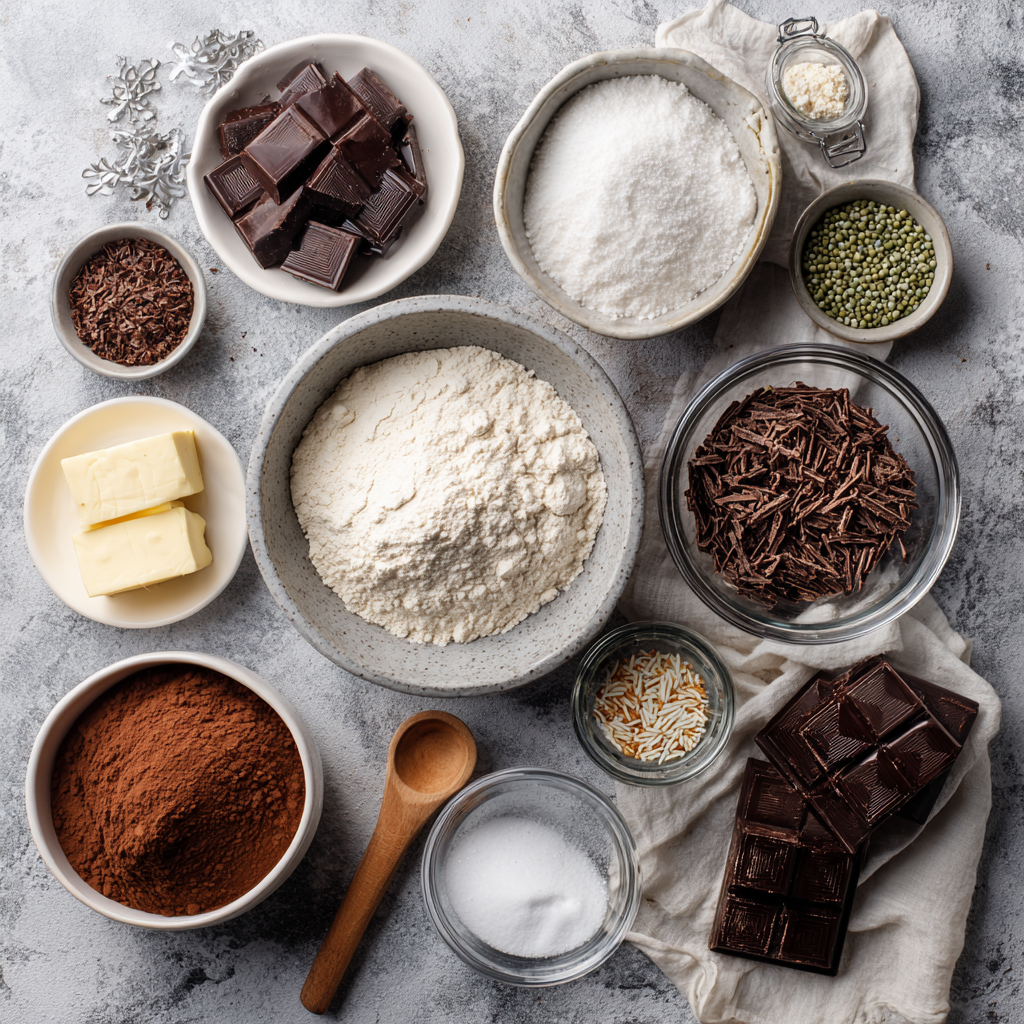
To achieve a tree that looks realistic and a chocolate base that stays moist, the frosting consistency and cocoa quality are the critical variables. Here is your curated shopping list.
The Base (Peppermint Chocolate Cupcakes):
- 1 ½ Cups All-Purpose Flour.
- ½ Cup Unsweetened Cocoa Powder: Dutch-processed provides a darker, fudgier color and smoother flavor than natural cocoa.
- 1 Cup Granulated Sugar.
- ½ Cup Milk: Room temperature.
- ½ Cup Vegetable Oil: Oil ensures a moister crumb than butter for chocolate cake.
- 2 Large Eggs.
- 1 Teaspoon Peppermint Extract: The festive twist (Vanilla works too if you dislike mint).
- 1 Teaspoon Baking Powder & ½ Teaspoon Baking Soda.
- ½ Teaspoon Salt.
- ½ Cup Boiling Water:
- The Science: Boiling water “blooms” the cocoa powder, releasing flavor compounds that are usually trapped in the starch.
The Tree Structure:
- 12 Sugar Cones: The pointed ice cream cones (not the flat-bottomed cake cups).
- Green Candy Melts (Optional): To coat the cone first (prevents sogginess), though frosting directly works perfectly if served the same day.
The Foliage (Vanilla Buttercream):
- 1 Cup (2 sticks) Unsalted Butter: Softened, but cool.
- 4 Cups Confectioners’ Sugar (Powdered Sugar).
- 2 Tablespoons Heavy Cream: Or milk.
- 1 Teaspoon Vanilla Extract.
- Gel Food Coloring: Leaf Green or Forest Green.
- Critical Spec: Do not use liquid food coloring; it adds too much water and will make the frosting droopy.
The Decorations:
- Multi-colored Sprinkles: (Ornaments).
- Powdered Sugar: (Snow).
- Yellow Star Sprinkles: (Toppers).
Substitutions:
- Cone-Free: You can pipe a tree using just frosting, but you need a very stiff consistency and a large amount of sugar.
- Gluten-Free: Use GF 1:1 flour for the cupcakes and ensure the sugar cones are certified GF (or omit the cone and use a strawberry as the base).
Timing
This is a fun project, so budget time for decorating.
- Preparation Time: 20 minutes.
- Baking Time: 18–20 minutes.
- Cooling Time: 30 minutes.
- Decorating Time: 30 minutes.
- Total Time: Approx. 1 hour 40 minutes.
Data Insight: Using a sugar cone reduces the amount of frosting needed per cupcake by approximately 40%. This not only lowers the sugar shock but creates a more balanced “crunch-to-cream” texture profile.
Step-by-Step Instructions
Step 1: The Batter Bloom
Preheat oven to 350°F (175°C). Line a 12-cup muffin tin with liners.
- Mix Dry: Whisk flour, cocoa, sugar, baking powder, baking soda, and salt in a large bowl.
- Mix Wet: Add milk, oil, eggs, and peppermint extract. Beat on medium speed for 2 minutes.
- The Bloom: Stir in the boiling water by hand. The batter will be very thin and runny. This is normal!
Step 2: Bake
Pour batter into liners (fill about 2/3 full).
- Bake: Bake for 18–20 minutes.
- Test: A toothpick inserted comes out clean.
- Cool: Remove from tin and cool completely on a wire rack. If you frost a warm cupcake, the tree will slide off.
Step 3: The Green Buttercream
Beat the butter until creamy. Gradually add powdered sugar and heavy cream.
- Tint: Add the green gel coloring until you reach your desired shade of pine.
- Consistency Check: The frosting should be stiff enough to hold a peak. If it’s too soft, add more sugar. If too stiff to pipe, add drops of cream.
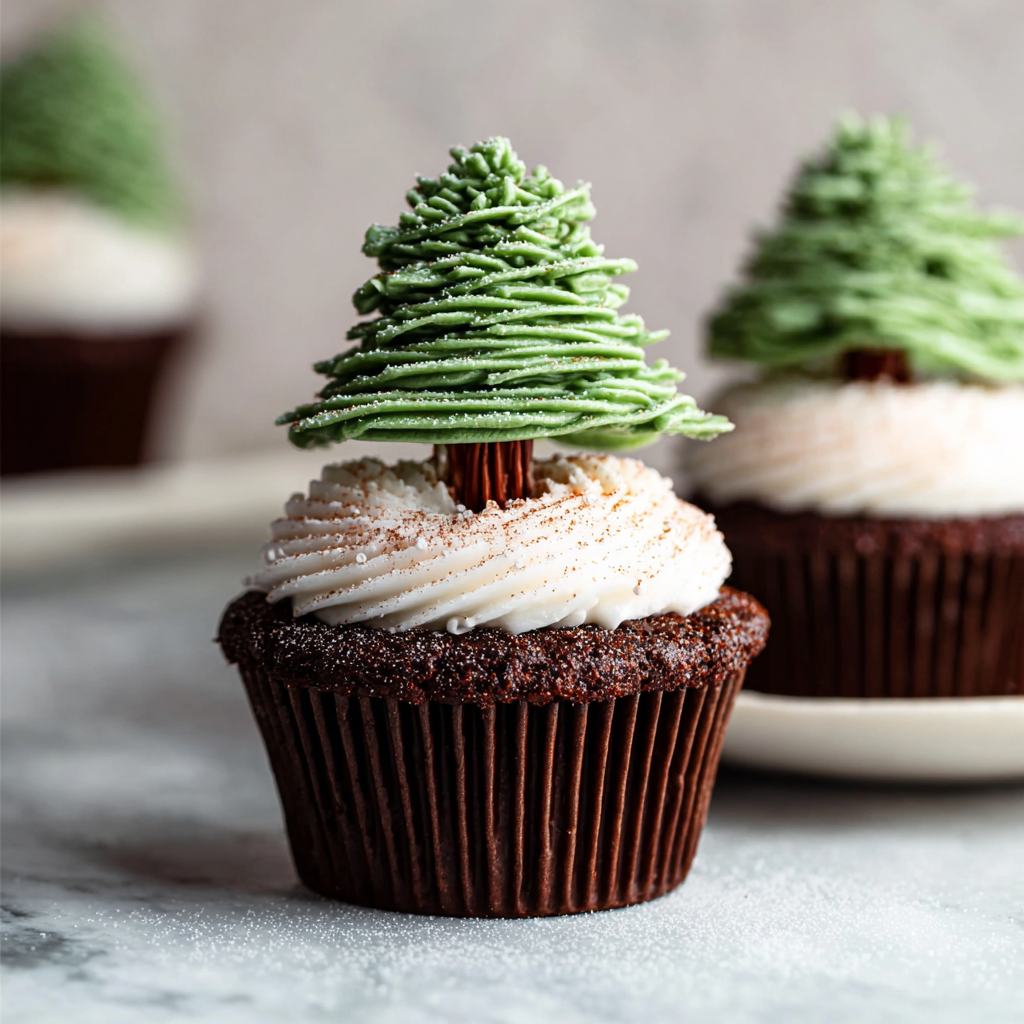
Step 4: The Tree Construction
The Glue: Spread a small circle of green frosting on top of the cooled cupcake.
- The Structure: Place a sugar cone upside down on the frosting circle. Press gently to secure it.
Step 5: Piping the Needles
Fit a piping bag with a Small Star Tip (like Wilton #21 or #16). Fill with green frosting.
- Technique: Start at the bottom of the cone. Pipe small stars or short lines, pulling away to create a “leaf” texture. Work your way around the cone in circles, moving upward until the entire cone is covered.
- Alternative: For a smoother look, use a leaf tip and pipe shingles.
Step 6: Trimming the Tree
- Ornaments: While the frosting is wet, gently press sprinkles onto the tree (using tweezers helps with precision).
- Topper: Place a yellow star sprinkle on the very tip.
- Snow: Dust lightly with powdered sugar right before serving using a small sieve.
Nutritional Information
These are a treat! Estimated breakdown per cupcake:
| Nutrient | Amount | % Daily Value |
| Calories | 410 kcal | – |
| Total Fat | 18g | 28% |
| Saturated Fat | 10g | 50% |
| Carbohydrates | 60g | 20% |
| Sugars | 45g | – |
| Protein | 4g | 8% |
Data Insight: The peppermint oil in the cake not only tastes like Christmas but acts as a mild digestive aid, potentially helping to settle the stomach after a rich holiday meal.
Healthier Alternatives for the Recipe
Customize your Tree Cupcakes for dietary needs:
- Lower Sugar Frosting:
- Use a Cream Cheese Frosting base (less sugar needed for structure) or a Swiss Meringue Buttercream (less sweet).
- Strawberry Tree:
- Instead of a sugar cone, place a whole fresh strawberry (washed and dried) on the cupcake and pipe green frosting over it. This cuts carbs significantly and adds fresh fruit.
- Dye-Free:
- Use Matcha Powder to color the frosting green naturally. It adds an earthy tea flavor that pairs uniquely well with chocolate.
Serving Suggestions
- The Platter: Arrange them on a white platter to look like a forest. Scatter coconut flakes on the platter base for “snow.”
- Pairing: Serve with Hot Cocoa or eggnog.
- Kids’ Activity: Bake the cupcakes and frost the cones green ahead of time, then let the kids put the “ornaments” (sprinkles) on as a party activity.
Common Mistakes to Avoid
Vertical baking has challenges.
- Warm Cupcakes:
- The Error: Assembling on a warm base.
- The Result: The butter in the frosting melts, and the tree topples over.
- The Fix: Cool completely. Freeze them for 10 minutes if in a rush.
- Liquid Dye:
- The Error: Using standard grocery store liquid food coloring.
- The Result: You have to use so much to get a deep green that the frosting becomes watery and the “needles” lose definition.
- The Fix: Gel paste coloring only.
- Stale Cones:
- The Error: Using old cones.
- The Result: A chewy, cardboard-like center.
- The Fix: Buy fresh cones.
Storing Tips for the Recipe
Height makes storage tricky.
- Container: You will need a tall cake carrier or a plastic storage bin. They won’t fit in standard shallow Tupperware.
- Room Temp: Store at cool room temperature for 2 days.
- Fridge: If making ahead by 3+ days, refrigerate. The cone may soften slightly over time as it absorbs moisture from the frosting.
- Freezing: Not recommended (the cone will get soggy).
Conclusion
Festive Chocolate Christmas Tree Cupcakes are the edible centerpiece that brings out the child in everyone. By combining the nostalgia of a sugar cone with the rich decadence of chocolate peppermint cake, you create a dessert that is as fun to disassemble and eat as it is to look at. It is architectural, delicious, and undeniably merry.
Summary: Rich chocolate peppermint cupcakes topped with an inverted sugar cone piped with green buttercream to resemble a Christmas tree.
Ready to decorate?
Get your piping bags ready! Rate this recipe 5 stars if your trees stood tall, and leave a comment below: star tip or leaf tip? Subscribe for more holiday baking magic!
FAQs
Can I make the cupcakes ahead?
Yes. Bake the cupcakes 1-2 days in advance and store them in an airtight container. Decorate them on the day of the party for the crispest cone.
Can I use store-bought frosting?
Technically yes, but commercial frosting is often softer/thinner. You may need to whip in an extra ½ cup of powdered sugar to stiffen it up so the “needles” hold their shape.
How do I transport these?
It is difficult! If you don’t have a tall carrier, use a deep roasting pan and cover the top loosely with foil (tenting it so it doesn’t touch the tips). Or, place a small dab of frosting on the bottom of each cupcake wrapper to “glue” it to the serving tray so they don’t slide.
Can I use white cake mix?
Absolutely. Just add the peppermint extract to the white cake batter for that holiday flavor, though the chocolate base provides a nicer color contrast like “soil” or “ground.”
Leave a Reply