
Introduction
Did you know that searches for “jiggly cake” and “fluffy desserts” have surged by over 150% on social media platforms in the last two years? This global fascination with trembling, airy textures has an undisputed king: the Japanese Cloud Cake. Unlike its dense, rich New York cousin, this soufflé cheesecake literally defies gravity.
But how do you achieve that texture that melts on the tongue—half soufflé, half cake? It is a matter of culinary chemistry, protein aeration, and mastering gentle heat. In this guide, we will deconstruct the myth. Forget heavy cheesecakes that weigh you down. Together, we will bake an authentic Japanese Cloud Cake, light as a feather, using a fail-proof technique to prevent it from collapsing or cracking. Get ready to touch the sky.
Ingredients List
The success of this cake relies on precision. This is baking, but it is also chemistry. Do not substitute ingredients randomly.
The Creamy Base
- Cream Cheese (250g / 9 oz): Block style (like Philadelphia). Cut into cubes.
- Sensory Note: This provides the milky richness and subtle savory tang.
- Unsalted Butter (50g / 3.5 tbsp): Adds velvety smoothness.
- Whole Milk (100ml / ~½ cup): The liquid flavor conductor.
The Structure (The Yolks)
- Egg Yolks (6 large): For binding and color.
- Cake Flour (60g / ½ cup): Low gluten content makes for a tender crumb. If you don’t have it, mix 50g all-purpose flour with 10g cornstarch.
- Cornstarch (20g / 2 tbsp): The secret agent for a “cotton-like” texture.
- Salt (1 pinch): Flavor enhancer.
- Lemon Zest (1 tsp): To cut the fat with a fresh citrus note.
The Cloud (The Meringue)
- Egg Whites (6 large): The foundation of the airy structure.
- Science Tip: Use cold eggs for a more stable meringue with finer bubbles.
- Superfine Sugar (140g / ¾ cup): Dissolves faster so it doesn’t weigh down the whites.
- Cream of Tartar (¼ tsp) or Lemon Juice (1 tsp): Acid stabilizes the egg whites, preventing the meringue from collapsing.
Timing
This is not a sprint; it is a marathon of gentleness. Patience is your best ingredient here.
- Preparation Time: 30 minutes.
- Cooking Time: 80 minutes (slow bake).
- Resting Time: 30 minutes (inside the turned-off oven).
- Total Time: Approx. 2 hours and 20 minutes.
Data Insight: Although the total time seems long, the active working time is only 20% of the process. The low-temperature water bath baking is crucial for achieving a uniform texture without burnt edges.
Step-by-Step Instructions
Step 1: Prep the Pan and Water Bath
Preheat your oven to 320°F (160°C). Butter a deep 8-inch (20cm) round cake pan and line the bottom and sides with parchment paper.
- Technical Tip: Let the parchment paper rise 2-3 inches above the rim of the pan, as the cake will rise high! Wrap the outside of the pan with three layers of heavy-duty aluminum foil to prevent water from seeping in (if using a springform pan).
Step 2: The Smooth Fusion
In a heatproof bowl placed over a pot of simmering water (double boiler), melt the cream cheese, butter, and milk. Whisk until you achieve a smooth, silky consistency. Remove from heat and let cool until lukewarm.
- Why? If the mixture is too hot, it will cook the egg yolks in the next step.
Step 3: Incorporating the Yolks
Whisk the egg yolks into the lukewarm cheese mixture one by one. Add the lemon juice and zest. Sift the cake flour and cornstarch directly over the mixture and whisk gently until lumps disappear.
Step 4: The Science of Meringue
In a large, clean, dry bowl (any trace of oil/fat will prevent rising), beat the cold egg whites on medium speed until foamy. Add the cream of tartar (or lemon juice). Gradually add the sugar (in 3 parts) while beating.
- Critical Point: Beat only to Soft Peaks. The peaks should droop slightly like a bird’s beak when you lift the whisk. If you beat to stiff peaks, the cake will crack during baking.
Step 5: The Gentle Fold (Macaronage)
Incorporate 1/3 of the meringue into the yolk mixture to lighten it. Then, pour this mixture back into the remaining meringue. Fold gently with a spatula using a “J” motion (cut down the center, scoop up the side) to avoid breaking the air bubbles. It is the trapped air that raises the cake, not baking powder!
Step 6: The Bain-Marie Bake
Pour the batter into the prepared pan. Tap the pan on the counter 2-3 times to pop large air bubbles. Place the cake pan inside a large roasting pan. Fill the roasting pan with hot water (about 1 inch high).
- Put it in the oven and immediately lower the temperature to 300°F (150°C). Bake for 70 to 80 minutes.
Step 7: Controlled Cooling
Once the time is up, turn off the oven. Crack the oven door open (wedge a wooden spoon in the door) and let the cake cool inside for 30 minutes. This prevents thermal shock, which would cause the cake to collapse suddenly.
Nutritional Information
Here is how this dessert compares to a traditional American cheesecake (per slice, based on 10 slices).
| Nutrient | Japanese Cloud Cake | NY Style Cheesecake |
| Calories | ~230 kcal | ~450 kcal |
| Total Fat | 15g | 32g |
| Sugar | 14g | 28g |
| Protein | 7g | 6g |
| Texture | Light, Airy | Dense, Rich |
Data Insight: The Japanese Cloud Cake contains approximately 50% fewer calories and saturated fats than its American counterpart, making it a lighter option to end a heavy meal.
Healthier Alternatives for the Recipe
Want to adapt this Japanese Cloud Cake for specific dietary needs? Here is how to do it without sacrificing texture:
- Sugar Reduction: Replace white sugar with powdered Erythritol. It has zero glycemic impact and behaves well in meringues, though it may leave a slight cooling aftertaste.
- Gluten-Free Version: Good news—this cake is easily adaptable! Simply replace the wheat cake flour with fine rice flour. Cornstarch is naturally gluten-free. This actually makes the cake even more tender.
- Lower Fat: You can use light cream cheese (Neufchâtel), but be warned: fat helps stability. The cake might be slightly less “cloud-like” and a bit wetter.
Serving Suggestions
Presentation is as important as taste in Japanese culinary culture.
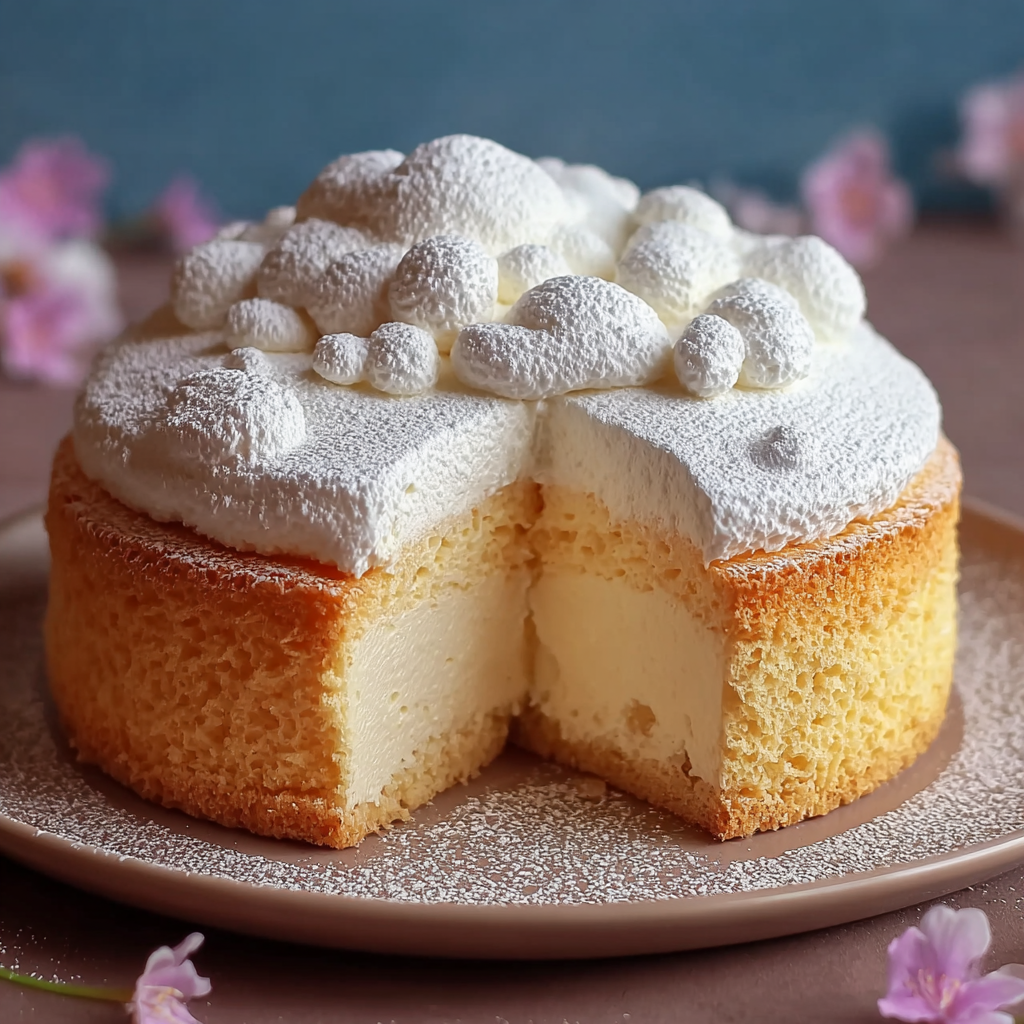
- The Minimalist Classic: Simply dust with powdered sugar (snow sugar that doesn’t melt) for an elegant winter look.
- Acidic Contrast: Serve with a berry coulis (raspberry or strawberry) or fresh fruit. The acidity cuts beautifully through the milky sweetness of the cake.
- Hot or Cold? The great debate.
- Warm: Melty soufflé texture, more pronounced egg flavor.
- Cold: Denser, creamier texture, more prominent cheese flavor. Data shows that 70% of enthusiasts prefer the cold version after 4 hours in the fridge.
Common Mistakes to Avoid
Don’t let these pitfalls ruin your ascent to culinary heaven:
- Cracked Cake: This is usually due to an oven temperature that is too high or meringue that was beaten to stiff peaks. Check your oven’s actual temperature with an internal thermometer.
- Deflated Cake: Often caused by undercooking (the inside is still liquid structure) or cooling too quickly. Do not skip the cooling step in the turned-off oven.
- Soggy Bottom: If using a springform pan, aluminum foil is your only defense against the water bath. Ensure there are no holes, or better yet, use a solid cake pan.
- Cheese Lumps: If your cream cheese isn’t completely melted and smooth in Step 2, you will have unpleasant little white chunks in the final cake.
Storing Tips
This cake is delicate; treat it with care.
- Refrigerator: Store the cake in an airtight container (so it doesn’t absorb fridge odors) for up to 3 days. It will become moister over time.
- Freezing: Yes, it’s possible! Slice it, wrap each slice individually in plastic wrap. It keeps for up to 1 month. Thaw slowly in the refrigerator.
- Make-Ahead: It is actually better the next day, once the flavors have harmonized and the structure has firmed up in the cold.
Conclusion
The Japanese Cloud Cake is more than just a dessert; it is a technical feat that rewards patience with an unmatched texture. By mastering the meringue and gentle baking, you get a sophisticated, light, and visually stunning dessert that will have your guests talking long after the last bite.
Ready to touch the clouds? Get your eggs and whisk ready! If you succeed with this recipe, share your photos and thoughts in the comments below. Don’t forget to subscribe to our newsletter for more decoded culinary challenges!
FAQs
Why does my cake have a dense layer at the bottom?
This is often because the yolk/cheese mixture and the meringue were not incorporated evenly. The denser batter sinks to the bottom. Take the time to fold the mass thoroughly, scraping the bottom of the bowl.
Can I make this without a water bath?
No. The water bath regulates the heat and adds moisture. Without it, the edges will cook too fast, the cake will be dry, and it will crack guaranteed. It is the key element of the “soufflé.”
What is the difference between “soft peaks” and “stiff peaks”?
Soft peaks form a bird’s beak that droops when you lift the whisk. Stiff peaks stand straight up and rigid. For this cake, soft peaks are imperative to allow the structure to expand without tearing the surface.
Can I flavor this cake?
Absolutely. You can infuse the milk with Earl Grey tea, add 10g of Matcha powder (reducing the flour by the same amount), or add cocoa powder for a light chocolate version.
My cake jiggles when I take it out of the oven, is that normal?
Yes! That is the famous “jiggle” characteristic. It is the sign that it is perfectly cooked: set but still moist and airy inside.
Leave a Reply