Tired of bland, repetitive meal prep? This Garlic Butter Chicken Meatballs with Cauliflower Rice recipe is your new weeknight champion. It’s packed with protein, low in carbs, and bursts with savory, melt-in-your-mouth flavor thanks to the rich garlic butter sauce.
This sheet pan and stovetop combination is designed for efficiency, delivering four days of perfectly balanced, delicious meals in under an hour. Get ready for a prep session that pays off all week long!
📝 Ingredients List: Prep for Four Days
This recipe is optimized for four generous servings, ensuring a balance of protein, fat, and healthy vegetables.
| Component | Ingredient | Quantity | Notes/Tip |
| Meatballs | Ground Chicken (or Turkey) | 1.5 lbs | Lean protein base. |
| Meatballs | Breadcrumbs (Panko or regular) | $1/4$ cup | Binds the meatballs. (Use almond flour for Keto/Low-Carb) |
| Meatballs | Egg | 1 large | Essential binder. |
| Meatballs | Garlic Powder | 1 teaspoon | For internal flavor. |
| Meatballs | Salt and Pepper | To taste | |
| Sauce | Unsalted Butter | $1/2$ cup (1 stick) | The base for the rich sauce. |
| Sauce | Fresh Garlic, minced | 4 cloves | Go generous for maximum garlic butter flavor. |
| Sauce | Chicken Broth (low sodium) | $1/4$ cup | Adds liquid to emulsify the sauce. |
| Sauce | Lemon Juice, fresh | 1 tablespoon | Cuts the richness of the butter. |
| Sauce | Fresh Parsley, chopped | 2 tablespoons | For garnish and freshness. |
| Side | Frozen Cauliflower Rice | 2 (12 oz) bags | The ultimate meal prep carb swap. |
| Side | Spinach (or other greens) | 2 cups | Add right to the cauliflower rice for a veggie boost. |
🕒 Timing: Prep and Cook for the Week
This recipe maximizes the use of simultaneous cooking methods (oven/stovetop) to cut down on total time.
| Step | Time Estimate | Notes |
| Meatball Prep | 10 minutes | Mixing and rolling. |
| Baking Meatballs | 20–25 minutes | Hands-off cooking time. |
| Garlic Butter Sauce | 5 minutes | Quick melting and simmering on the stovetop. |
| Cauliflower Rice | 10 minutes | Quick stir-fry on the stovetop. |
| Assembly & Portioning | 10 minutes | The final step of the meal prep. |
| Total Active Time | Approx. 40 minutes | Efficient use of two cooking surfaces. |
🛠️ Step-by-Step Instructions
Follow these steps for perfect, tender meatballs and flavorful prep bowls.
1. Prep the Meatballs and Preheat
Preheat your oven to $400^\circ F$ ($200^\circ C$). Line a large baking sheet with parchment paper. In a medium bowl, gently combine the ground chicken, breadcrumbs, egg, garlic powder, salt, and pepper.
- Tip: Do not overmix! Overmixing leads to tough, rubbery meatballs.
2. Roll and Bake
Roll the mixture into small, uniform meatballs (about 1 to 1.5 inches in diameter—you should get about 20-24 meatballs). Arrange them evenly on the prepared baking sheet. Bake for 20–25 minutes, or until the internal temperature reaches $165^\circ F$ ($74^\circ C$) and they are lightly browned.
3. Prepare the Cauliflower Rice Base
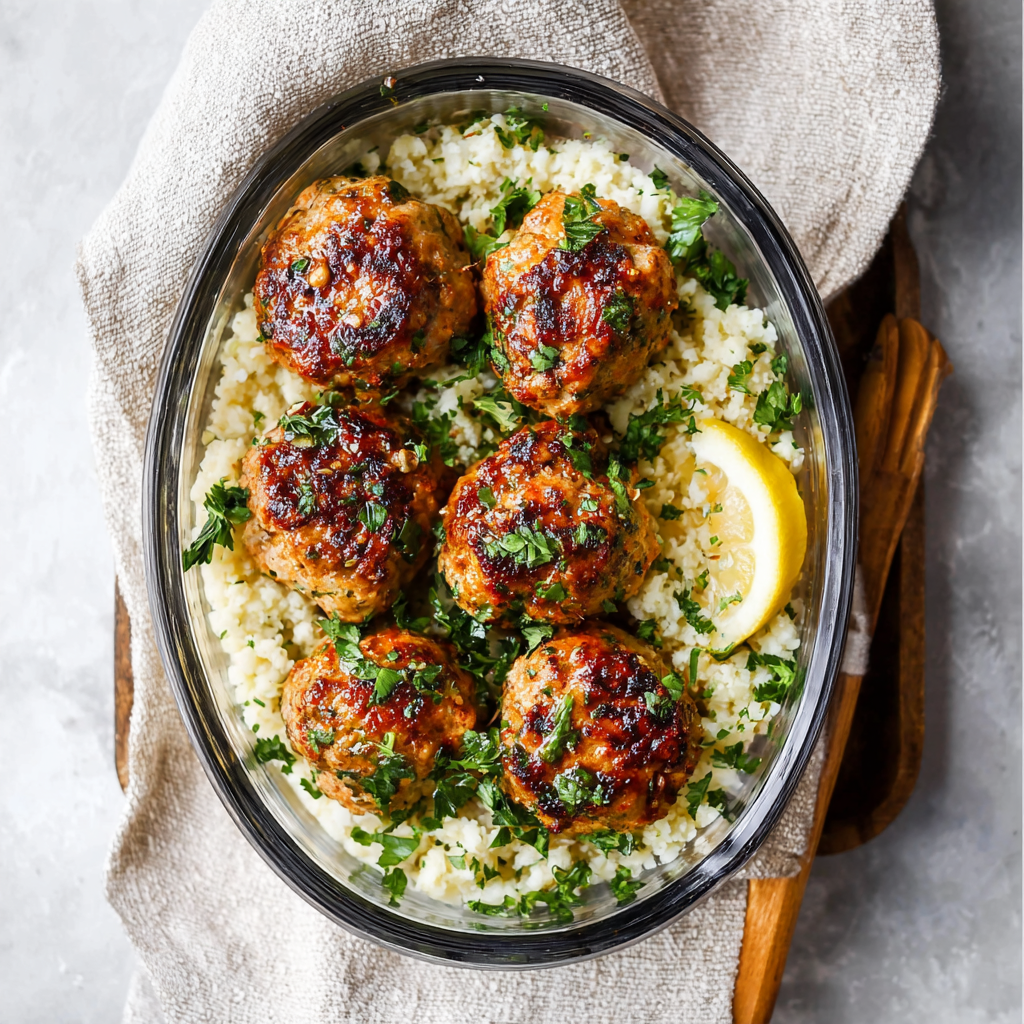
While the meatballs are baking, heat a large skillet or wok over medium-high heat. Add a tablespoon of olive oil. Add the frozen cauliflower rice and stir-fry for 5–7 minutes until heated through. Stir in the spinach until it wilts (about 2 minutes). Season with salt and pepper. Divide the rice base evenly among your four meal prep containers.

4. The Garlic Butter Sauce
While the rice is cooking, prepare the sauce in a small saucepan. Melt the $1/2$ cup of butter over medium-low heat. Add the minced garlic and cook for about 1 minute, stirring constantly, until fragrant (do not let the garlic burn!). Whisk in the chicken broth and lemon juice. Remove from heat and stir in the fresh parsley.
5. Glaze and Assemble
Remove the baked meatballs from the oven. Carefully transfer them to the saucepan with the garlic butter sauce. Gently toss the meatballs until they are fully coated in the luxurious glaze.
- Meal Prep Note: You can either toss all the meatballs or keep the sauce separate for each container. Tossing them now ensures maximum flavor absorption.
6. Portion and Store
Place 5–6 glazed meatballs on top of the cauliflower rice base in each of the four meal prep containers. Let the meals cool completely to room temperature before sealing and storing them in the refrigerator.
🍽️ Meal Prep and Storage
- Storage: Store sealed containers in the refrigerator for up to 4 days.
- Reheating: Reheat in the microwave for 1.5 to 2 minutes. The garlic butter will melt back into a liquid, keeping the meatballs and rice moist and flavorful.
- Serving Tip: A sprinkle of fresh grated Parmesan cheese right before reheating adds an extra salty, savory boost.
💡 Expert Tips & Variations
- Low-Carb/Keto Swap: For a strict low-carb meal, replace the breadcrumbs with $1/4$ cup of almond flour and add 1/4 teaspoon of Italian seasoning to the meatball mix.
- Freezing: You can freeze the cooked and cooled meatballs (without the sauce) in a zip-top bag for up to 3 months. Thaw them, reheat, and toss them in freshly made garlic butter before serving.
- Vegetable Boost: If you like, you can add small broccoli florets or diced zucchini to the baking sheet during the last 10 minutes of the meatball bake for additional roasted vegetables.
❓ FAQs
Q: Can I use ground beef instead of chicken?
A: Yes, ground beef (80/20 mix works well) is a great substitute. However, beef meatballs tend to be firmer. You may need to bake them for an extra 5 minutes, and they pair well with a slightly bolder sauce (consider adding a dash of smoked paprika to the garlic butter).
Q: Why is my cauliflower rice soggy after I reheat it?
A: Cauliflower rice releases moisture when frozen and cooked. To avoid sogginess, make sure you don’t cover the skillet when stir-frying in step 3. The high heat and open air help the moisture evaporate. Also, ensure you use the frozen bags, as fresh cauliflower rice tends to be more delicate for meal prepping.
Q: How do I prevent the garlic from burning in the sauce?
A: The key is low heat. Use medium-low heat when melting the butter, and only cook the garlic for about 1 minute. The heat from the melted butter is usually enough to infuse the flavor without browning or burning the garlic, which can quickly turn bitter.
Leave a Reply