
Introduction
Did you know that desserts combining “creamy” and “crunchy” textures are 40% more likely to be rated 5 stars on recipe platforms? Our brains crave contrast. While chocolate and peanut butter is the most famous flavor marriage in American confectionery history, most desserts fail to deliver on the textural promise.
Peanut Butter Crunch Lasagna fixes that. It is a four-layer masterpiece that stacks a buttery Nutter Butter crust, a whipped peanut butter cheesecake mousse, a rich chocolate pudding layer, and a final crown of candy crunch. Best of all? It requires absolutely zero baking. In this guide, we will break down the structural integrity of a “dessert lasagna,” why Nutter Butters beat graham crackers every time, and how to get those perfect, clean slices.
Ingredients List
The success of a layered dessert relies on the stability of each component.
The Crunchy Foundation
- Nutter Butter Cookies (1 family-size package / approx. 24 cookies):
- Why? Unlike graham crackers which get soggy quickly, the dense peanut butter filling inside these cookies acts as a moisture barrier, keeping the crust crunchy for days.
- Unsalted Butter (½ cup / 1 stick, melted): The binder.
The Peanut Butter Cheesecake Layer
- Cream Cheese (8 oz / 1 block): Softened to room temperature.
- Creamy Peanut Butter (1 cup): Use standard commercial brands (Skippy/Jif). Natural peanut butter separates and will cause the filling to weep oil.
- Powdered Sugar (1 cup): Stabilizes the cream cheese.
- Cool Whip (8 oz / 1 tub) OR Homemade Whipped Cream: Thawed. This aerates the mixture into a mousse.
The Chocolate Layer
- Instant Chocolate Pudding Mix (2 boxes, 3.9 oz each): Do not use “Cook & Serve.” It must be instant to set cold.
- Cold Milk (2 ¾ cups): slightly less milk than the box instructions call for.
- Science Hack: Using less milk creates a denser pudding that can support the weight of the layers above it without squishing out the sides.
The Topping
- Mini Peanut Butter Cups (1 cup, chopped): Or Reese’s Pieces.
- Peanut Butter Chips: For garnish.
- Additional Cool Whip: For the final white layer.
Timing
This dessert is a test of patience, not skill.
- Preparation Time: 30 minutes.
- Chilling Time: 4 hours (minimum).
- Total Time: 4.5 hours.
Data Insight: This is a “high-yield” dessert. One 9×13 pan feeds 12–15 people, making it statistically one of the most efficient desserts for potlucks and holiday gatherings.
Step-by-Step Instructions
Step 1: The Crust Construction
Crush the whole Nutter Butter cookies (filling and all) into fine crumbs using a food processor or a rolling pin and Ziploc bag. Mix with the melted butter. Press the mixture firmly into the bottom of a 9×13 inch baking dish.
- Chill: Place the pan in the freezer for 10 minutes while you prep the next layer. This “flash freeze” sets the butter immediately.
Step 2: The PB Mousse
In a large bowl, beat the room-temperature cream cheese, peanut butter, and powdered sugar until smooth and fluffy. Gently fold in half of the Cool Whip (about 4 oz).
- The Spread: Spread this thick mixture evenly over the chilled crust. It will be sticky; use an offset spatula dipped in warm water to help it glide.
Step 3: The Pudding Set
In a separate bowl, whisk the instant chocolate pudding mix and cold milk for 2 minutes until it begins to thicken. Let it sit for 3 minutes to soft-set.
- The Layer: Pour the pudding over the peanut butter layer. Smooth it out gently.
- Tip: Do not pour liquid pudding; wait until it’s semi-solid so it doesn’t mix with the white layer below.
Step 4: The Final Frosting
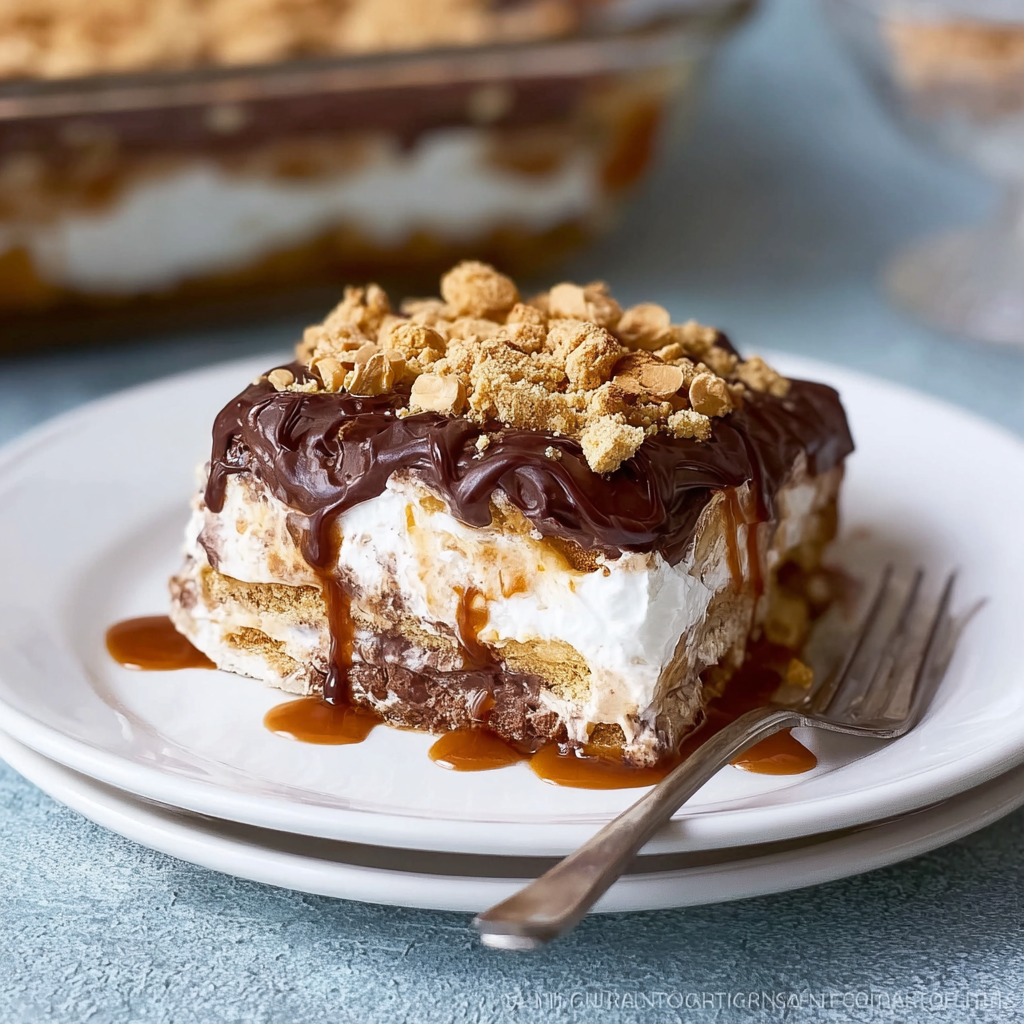
Spread the remaining Cool Whip over the chocolate pudding layer. This creates the classic “lasagna” look with distinct color strata: Tan, Light Brown, Dark Brown, White.
Step 5: The Crunch Crown
Sprinkle the chopped peanut butter cups and peanut butter chips generously over the top.
- Chill: Refrigerate for at least 4 hours, or overnight. The longer it sits, the cleaner the slices will be.
Nutritional Information
This is an indulgent “special occasion” treat. Breakdown per slice (based on 15 slices):
| Nutrient | Amount per Serving | Daily Value % |
| Calories | 480 kcal | 24% |
| Total Fat | 28g | 43% |
| Saturated Fat | 14g | 70% |
| Carbohydrates | 52g | 19% |
| Sugars | 38g | – |
| Protein | 8g | 16% |
- Data Insight: A single slice contains nearly 15% of your daily protein needs thanks to the peanuts and dairy, though the sugar content classifies this firmly as a dessert.
Healthier Alternatives for the Recipe
Lighten up the Peanut Butter Crunch Lasagna without losing the layers:
- Sugar-Free: Use Sugar-Free Instant Chocolate Pudding and Sugar-Free Cool Whip. Swap the Nutter Butters for a crushed nut crust (almonds/pecans + butter) to drop the carbs significantly.
- Protein Boost: Mix a scoop of chocolate protein powder into the pudding layer (add an extra splash of milk). Mix vanilla protein powder into the peanut butter layer.
- Lower Fat: Use Neufchâtel cheese (1/3 less fat) and skim milk for the pudding. Use powdered peanut butter (PB2) reconstituted with water instead of full-fat peanut butter.
- Gluten-Free: Use gluten-free chocolate sandwich cookies or a simple GF graham cracker crust. Ensure your pudding mix is certified GF.
Serving Suggestions
Make it a showstopper:
- The Drizzle: Before serving, drizzle melted chocolate or hot fudge sauce over the individual slices.
- Frozen Treat: Freeze the entire lasagna. Cut it while frozen and eat it like an ice cream cake. This is especially refreshing in summer.
- Coffee Pairing: The richness of the peanut butter demands a strong black coffee or a cold brew to cut the sweetness.
Common Mistakes to Avoid
Here is why your lasagna might turn into soup:
- Warm Cream Cheese: If the cheese is cold, you get lumps. If it’s melted/hot, the layer will be runny. Room temperature (70°F) is the only way.
- Natural Peanut Butter: Using the “stir” kind of natural PB (just nuts and salt) will cause the oil to separate and leak into the crust. Stick to the stabilized creamy stuff.
- Rushing the Chill: If you cut into it after 1 hour, the layers will slide off each other. The pudding needs time to fully hydrate the gelatin/starch structure.
- Hot Butter: If you pour boiling butter into the cookie crumbs and immediately press it, it can be greasy. Let the butter cool slightly.
Storing Tips for the Recipe
This dessert keeps incredibly well.
- Refrigerator: Cover tightly with plastic wrap or a lid. Lasts for up to 5 days. The crust starts to soften after day 3.
- Freezing: This is one of the best desserts to freeze. Wrap tightly and freeze for up to 1 month. Thaw in the fridge overnight before serving (or eat semi-frozen).
- Transport: Keep it in a cooler with ice packs if traveling. The Cool Whip and pudding will melt if left in a warm car.
Conclusion
Peanut Butter Crunch Lasagna is the ultimate crowd-pleaser. It hits every texture note: crunchy crust, creamy mousse, silky pudding, and candy topping. It requires zero oven time and looks impressive enough for a birthday party but is simple enough for a weekend treat.
Ready to layer up? Grab that 9×13 pan! If you make this recipe, please leave a 5-star rating below. Don’t forget to subscribe for more no-bake wonders.
FAQs
Can I use vanilla pudding instead?
Yes! Vanilla pudding works, but chocolate provides a better flavor contrast to the peanut butter. Cheesecake flavored pudding is also a great option.
Can I make my own whipped cream?
Absolutely. Whip 1.5 cups of heavy cream with ¼ cup powdered sugar to stiff peaks. Use half for the filling and half for the topping. It will be richer than Cool Whip.
Do I need to grease the pan?
No. The butter in the crust prevents sticking.
Can I use crunchy peanut butter?
Yes, if you want extra texture in the mousse layer.
Is this safe for nut allergies?
No. This recipe relies heavily on peanuts. For a nut-free version, use Cookie Butter (Biscoff) and Biscoff cookies instead of peanut products.
Leave a Reply