
Introduction
Did you know that “Red Velvet” wasn’t originally named for its color, but for its texture? The reaction between acidic buttermilk and raw cocoa powder softened the flour, creating a velvety crumb. Today, however, we know it for that stunning crimson hue that dominates Valentine’s Day and Christmas tables.
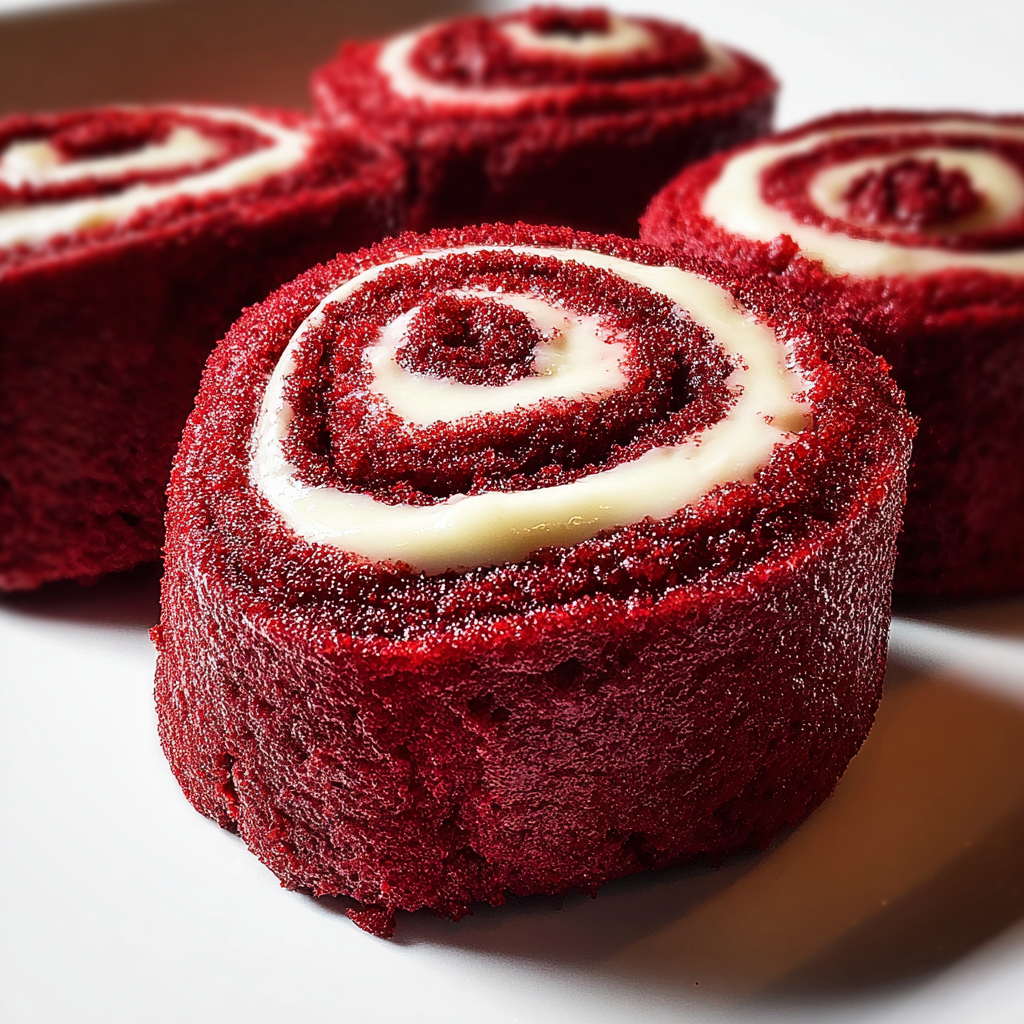
These Red Velvet Cinnamon Rolls (or Rouleaux de Cannelle Red Velvet) are the ultimate hybrid indulgence. We are taking the soft, brioche-like texture of a classic cinnamon roll, infusing it with mild cocoa, and smothering it in the tangy cream cheese frosting that Red Velvet cake is famous for. In this guide, we will master the art of working with dyed yeast dough, ensure your rolls stay vibrant red after baking, and create a filling that doesn’t leak out.
Ingredients List
To get that authentic Red Velvet flavor and look, specific ingredients are non-negotiable.
The Velvet Dough
- All-Purpose Flour (3 ½ – 4 cups): Provides the structure.
- Cocoa Powder (2 tbsp): Unsweetened. This gives the subtle chocolate note essential to Red Velvet.
- Instant Yeast (1 packet / 2 ¼ tsp): For the rise.
- Milk (1 cup): Warm ($110^{\circ}\text{F}$ / $45^{\circ}\text{C}$).
- Granulated Sugar (⅓ cup): Feeds the yeast.
- Butter (¼ cup, melted): Unsalted.
- Egg (1 large): Room temperature.
- Red Food Coloring (1 tbsp Liquid or 1 tsp Gel):
- Pro Tip: Use Gel Paste Coloring (like Americolor or Wilton). Liquid dye adds too much moisture and often turns pink/brown during baking. Gel stays vibrant red.
- Salt (1 tsp).
The Filling
- Brown Sugar (½ cup, packed): Light or dark.
- Granulated Sugar (¼ cup): For crunch.
- Cinnamon (1 tbsp): Don’t skimp!
- Butter (⅓ cup, softened): To spread on the dough.
The Cream Cheese Frosting
- Cream Cheese (4 oz / ½ block): Softened.
- Butter (¼ cup): Softened.
- Powdered Sugar (1 ½ cups): Sifted.
- Vanilla Extract (1 tsp).
Timing
Yeast dough requires patience. Plan ahead.
- Prep Time: 30 minutes.
- Rise Time: 2 hours (divided).
- Bake Time: 20–25 minutes.
- Total Time: Approx. 3 hours.
Data Insight: Allowing the dough to rise in a warm, draft-free environment (like an oven with just the light turned on) can reduce proofing time by 15–20%.
Step-by-Step Instructions
Step 1: The Red Dough Mix
In the bowl of a stand mixer, whisk together the warm milk, sugar, and yeast. Let sit for 5 minutes until foamy.
- Add the melted butter, egg, cocoa powder, and red food coloring. Whisk until the liquid is a deep, dark red.
- Add the flour and salt. Mix with the dough hook on low speed.
Step 2: Knead and Rise
Knead on medium speed for 5–7 minutes. The dough should be tacky (sticky to the touch) but should pull away cleanly from the sides of the bowl.
- The Color Check: If the dough looks pink, add more dye now. It creates a mess, but it’s your last chance!
- Place dough in a greased bowl, cover with plastic wrap, and let rise in a warm place for 60–90 minutes until doubled in size.
Step 3: Roll and Fill
Punch down the risen dough. On a lightly floured surface, roll it out into a large rectangle (approx. 12×18 inches).
- Spread the softened butter over the entire surface.
- Whisk the brown sugar, white sugar, and cinnamon together. Sprinkle heavily over the butter.
Step 4: The Roll Up
Start from the long edge and roll the dough tightly into a log.
- Cutting: Use unflavored dental floss or a sharp serrated knife to cut the log into 12 even rolls. (Floss prevents squishing the layers).
- Place rolls in a greased 9×13 baking pan.
Step 5: Second Rise & Bake
Cover the pan and let rise again for 30–45 minutes. They should look puffy and touch each other.
- Preheat oven to $350^{\circ}\text{F}$ ($175^{\circ}\text{C}$).
- Bake for 20–25 minutes.
- Don’t Overbake: Since the dough is red, you can’t rely on “golden brown” visual cues. Tap the center roll; it should sound hollow-ish, not squishy.
Step 6: The Frosting
While rolls bake, beat the cream cheese and butter until smooth. Add powdered sugar and vanilla. Beat until fluffy.
- Frost Warm: Spread the frosting over the rolls while they are still warm (not piping hot). This allows some frosting to melt down into the spirals.
Nutritional Information
A decadent holiday breakfast. Breakdown per roll:
| Nutrient | Amount per Serving | Daily Value % |
| Calories | 380 kcal | 19% |
| Total Fat | 16g | 25% |
| Saturated Fat | 9g | 45% |
| Carbohydrates | 56g | 20% |
| Sugars | 32g | – |
| Protein | 6g | 12% |
- Data Insight: The addition of cocoa powder adds a negligible amount of caffeine but provides the specific pH balance that gives Red Velvet its “tang.”
Healthier Alternatives for the Recipe
Adapt Red Velvet Cinnamon Rolls to your needs:
- Natural Dye: If you are averse to Red 40 dye, use Beet Root Powder or concentrated beet juice.
- Note: Beet juice adds moisture, so you may need an extra tablespoon of flour. The color will be a more earthy, rusty red rather than neon bright.
- Lighter Frosting: Swap the cream cheese frosting for a simple Greek Yogurt Glaze (Greek yogurt + powdered sugar + vanilla) to cut fat and increase protein.
- Vegan: Use plant-based milk (almond or oat), vegan butter sticks, and a “flax egg” (1 tbsp flax meal + 3 tbsp water). Ensure your red dye is vegan (some red dyes use cochineal beetles).
Serving Suggestions
Make it a brunch feast:
- The Drink: Serve with cold milk or a hot latte. The creaminess balances the spice.
- Garnish: Sprinkle fresh red heart sprinkles or chocolate shavings on top of the white frosting for contrast.
- Timing: Serve fresh. Red Velvet tends to dry out faster than regular dough due to the cocoa powder absorbing moisture.
Common Mistakes to Avoid
Here is why your rolls might fail:
- Staining: Red dye stains everything. Wear gloves when kneading by hand, and wipe up counter spills immediately.
- Brown Dough: If you use too much cocoa powder and not enough dye, the rolls will turn a muddy brown. Stick to the 2 tablespoons of cocoa limit.
- Dead Yeast: If your milk is too hot (over $120^{\circ}\text{F}$), it will kill the yeast. If it doesn’t foam in Step 1, start over.
Storing Tips for the Recipe
Keep them soft.
- Room Temperature: Store in an airtight container for 2 days.
- Refrigerator: Not recommended, as the fridge dries out bread.
- Freezing:
- Unbaked: Freeze the cut rolls in the pan. Thaw in the fridge overnight, rise on the counter, then bake.
- Baked: Freeze frosted rolls individually. Microwave for 30 seconds to revive.
Conclusion
Red Velvet Cinnamon Rolls are a showstopper. They combine the comfort of homemade bread with the glamour of a bakery cake. Whether it’s for a romantic Valentine’s breakfast or a festive Christmas morning, these rolls deliver on flavor, texture, and visual impact.
Ready to paint the kitchen red? Grab that food coloring! If you try this recipe, please leave a 5-star rating below.
FAQs
Can I make these overnight?
Yes! Perform Steps 1 through 4. After cutting the rolls and putting them in the pan, cover tightly and put them in the fridge overnight (instead of the second rise). In the morning, let them sit on the counter for 45 minutes to come to room temperature and puff up before baking.
Do they taste like chocolate?
Only slightly. Red Velvet is not a chocolate cake; it is a vanilla cake with a hint of cocoa. These taste like a standard cinnamon roll with a very mild, earthy chocolate undertone.
Can I use bread flour?
Yes. Bread flour has more protein and will result in a chewier, fluffier roll (more like a Cinnabon). All-purpose flour makes a softer, cake-like roll. Both work great.
My dough is too sticky to handle!
Humidity affects flour. If the dough sticks to your fingers, add flour 1 tablespoon at a time until it is manageable. Don’t add too much, or the rolls will be tough.
Leave a Reply